Accept Crypto Payments with WooCommerce (WordPress)
Table of Contents
Cryptocurrency is no longer a niche innovation — it’s becoming a practical payment method used by millions worldwide. For WooCommerce store owners, this shift opens a real opportunity: accepting crypto payments can expand your audience, remove barriers for international customers, and offer faster, more reliable transactions compared to traditional payment methods.
By integrating a crypto payment plugin, you can add an additional checkout option without redesigning your store or dealing with complex technical setups. Crypto payments reduce friction, eliminate chargebacks, and give your customers a fast and private way to pay — all while helping your business stay competitive in a rapidly changing e-commerce landscape.
What Is a WooCommerce Payment Plugin?
A WooCommerce payment plugin is a tool that enables your online store to accept cryptocurrency directly at checkout. Instead of handling wallet addresses manually, the plugin automates the entire process: it generates unique payment details for each order, verifies incoming transactions, and can even convert crypto payments into fiat to protect your revenue from market volatility.
This solution offers instant settlement, low fees, and protection from chargebacks — benefits that are difficult to achieve with traditional payment systems. With a straightforward setup and intuitive controls, a WooCommerce crypto plugin is suitable for beginners and experienced store owners looking to offer more flexible and modern payment options.
Why Should You Accept Cryptocurrency Payments?
Accepting cryptocurrency payments gives your business real, measurable advantages:
-
Global reach. Crypto allows customers from regions with limited banking access to shop freely, removing barriers like failed card payments or unavailable payment processors.
-
Lower fees and no chargebacks. Crypto transactions cost significantly less than credit card processing and completely eliminate chargeback risks, which protects your revenue.
-
Fast settlement. Payments arrive within minutes, not days — which improves cash flow and reduces dependence on slow banking systems.
-
Appeal to modern buyers. A growing number of customers prefer paying with Bitcoin, USDT, and other digital assets. Supporting crypto shows that your brand is adapting to what buyers actually want today.
By integrating crypto payments, you not only improve convenience but also position your business as forward-thinking and ready for global e-commerce.
How to Accept Crypto Payments with WordPress?
There are several ways to start accepting cryptocurrency payments on your WordPress website, but two stand out as the most common options.
The first method is the simplest. You can display your wallet address and let customers send payments directly to it. However, this approach has significant downsides. It requires manual payment confirmation, lacks automation, and may confuse customers who are new to crypto transactions. Plus, it doesn’t provide essential features like invoice generation or exchange rate adjustments, making it impractical for scaling businesses.
The second and more efficient option is to use a dedicated plugin for WooCommerce. Such plugins automate the entire process—from generating unique payment addresses to verifying transactions and even converting cryptocurrencies to fiat currencies or other digital assets if desired. They provide a seamless and user-friendly experience for both business owners and customers themselves, ensuring secure, fast, and hassle-free crypto payments. This solution is ideal for businesses that want to stay competitive and streamline their operations.

How to Set Up the WordPress Payment Plugin?
Integrating crypto payments on your site is easier than you might think, with payment plugins by Cryptomus. All you need to do is install it correctly. You can download this plugin directly from the Cryptomus website or from the official WordPress plugin store.
Downloading the WooCommerce Payment Plugin through the Cryptomus Website
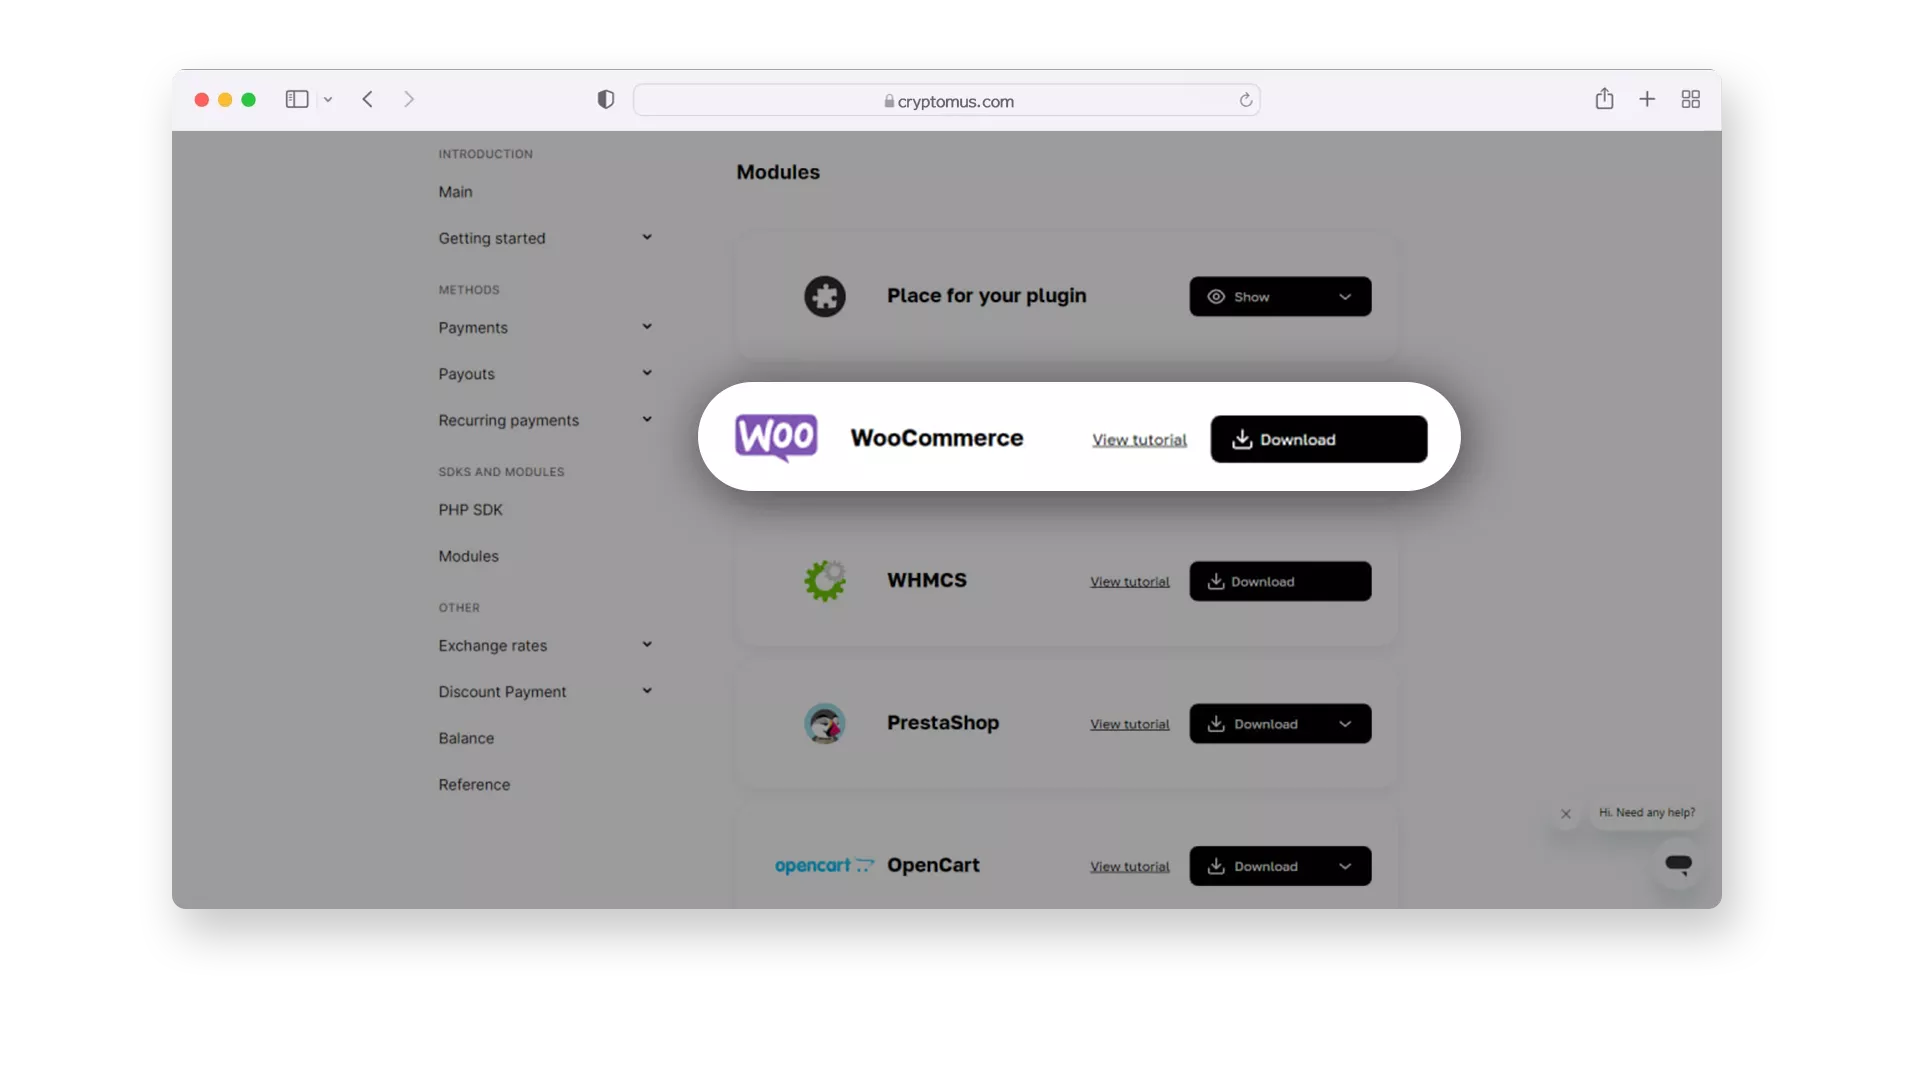
- Go to Cryptomus.com Homepage.
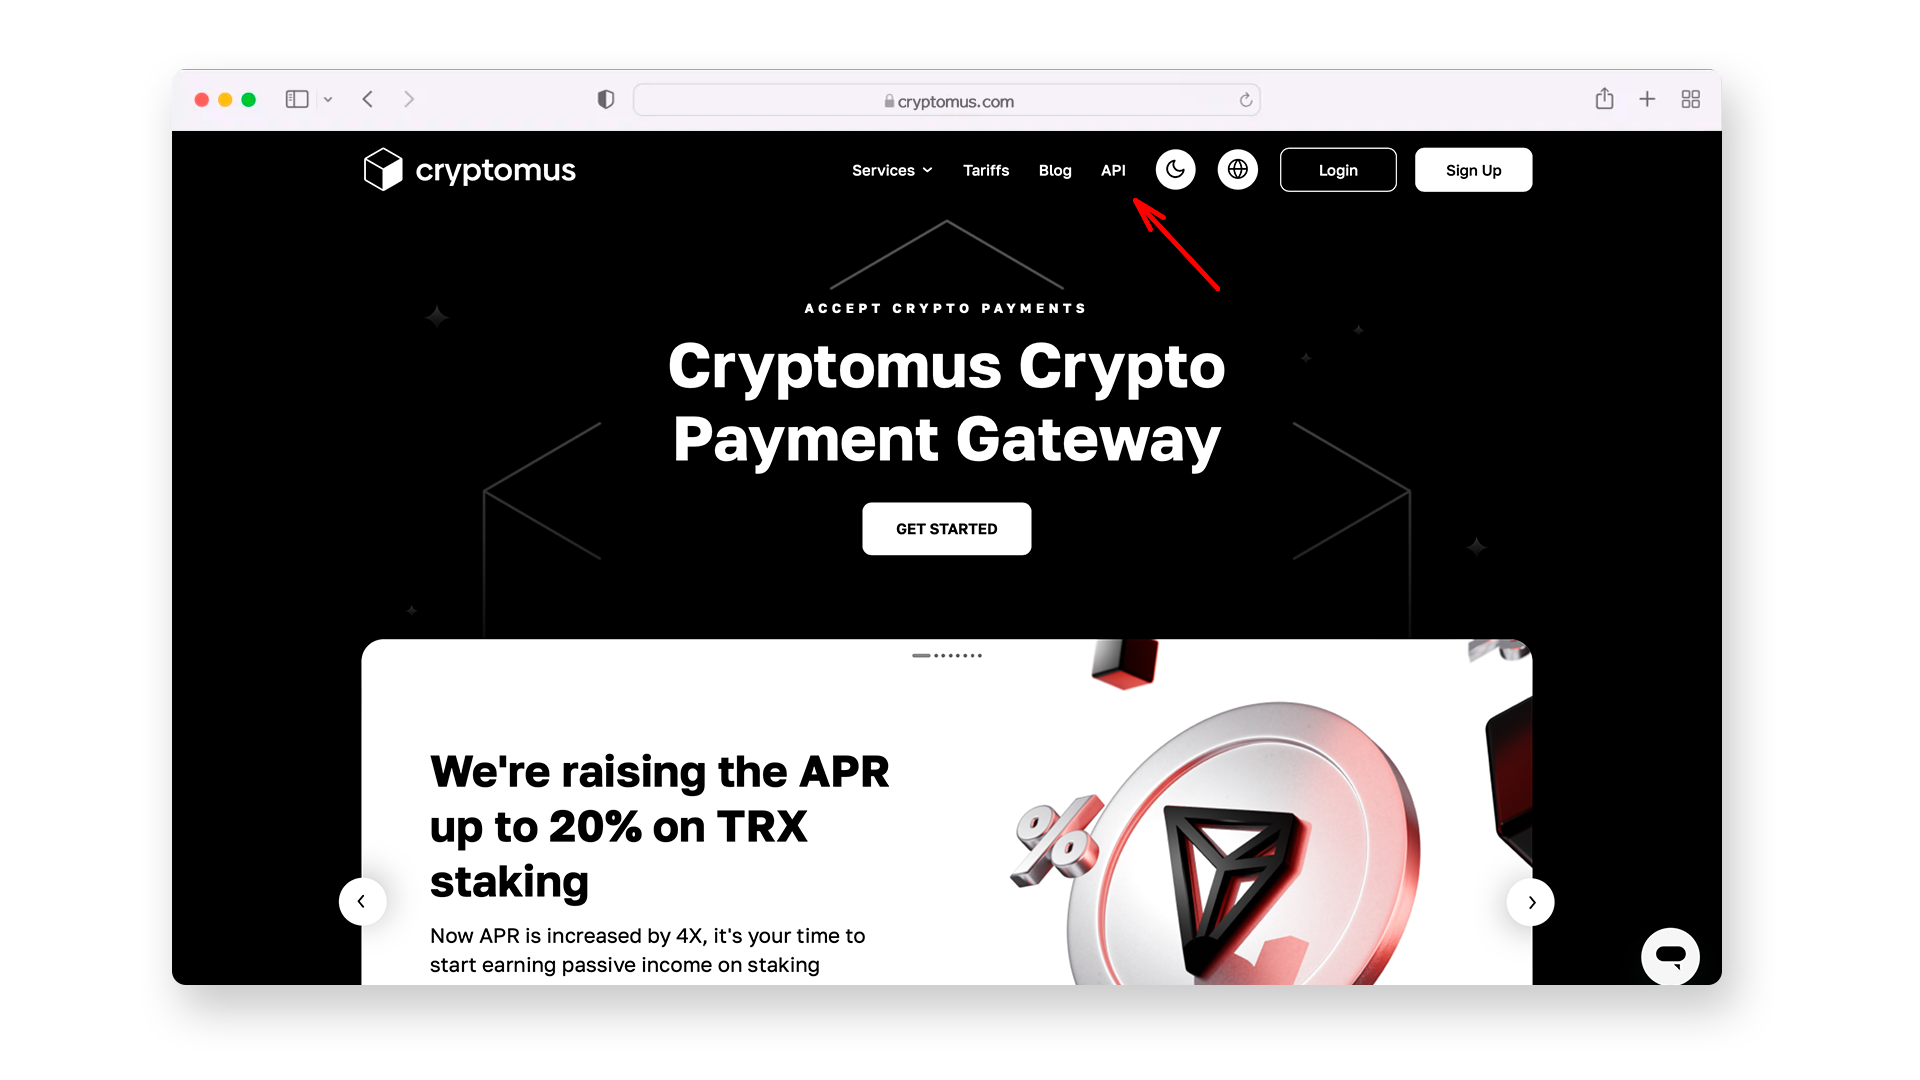
- Navigate to the API section of the main menu > in the top menu select the Business > Modules.
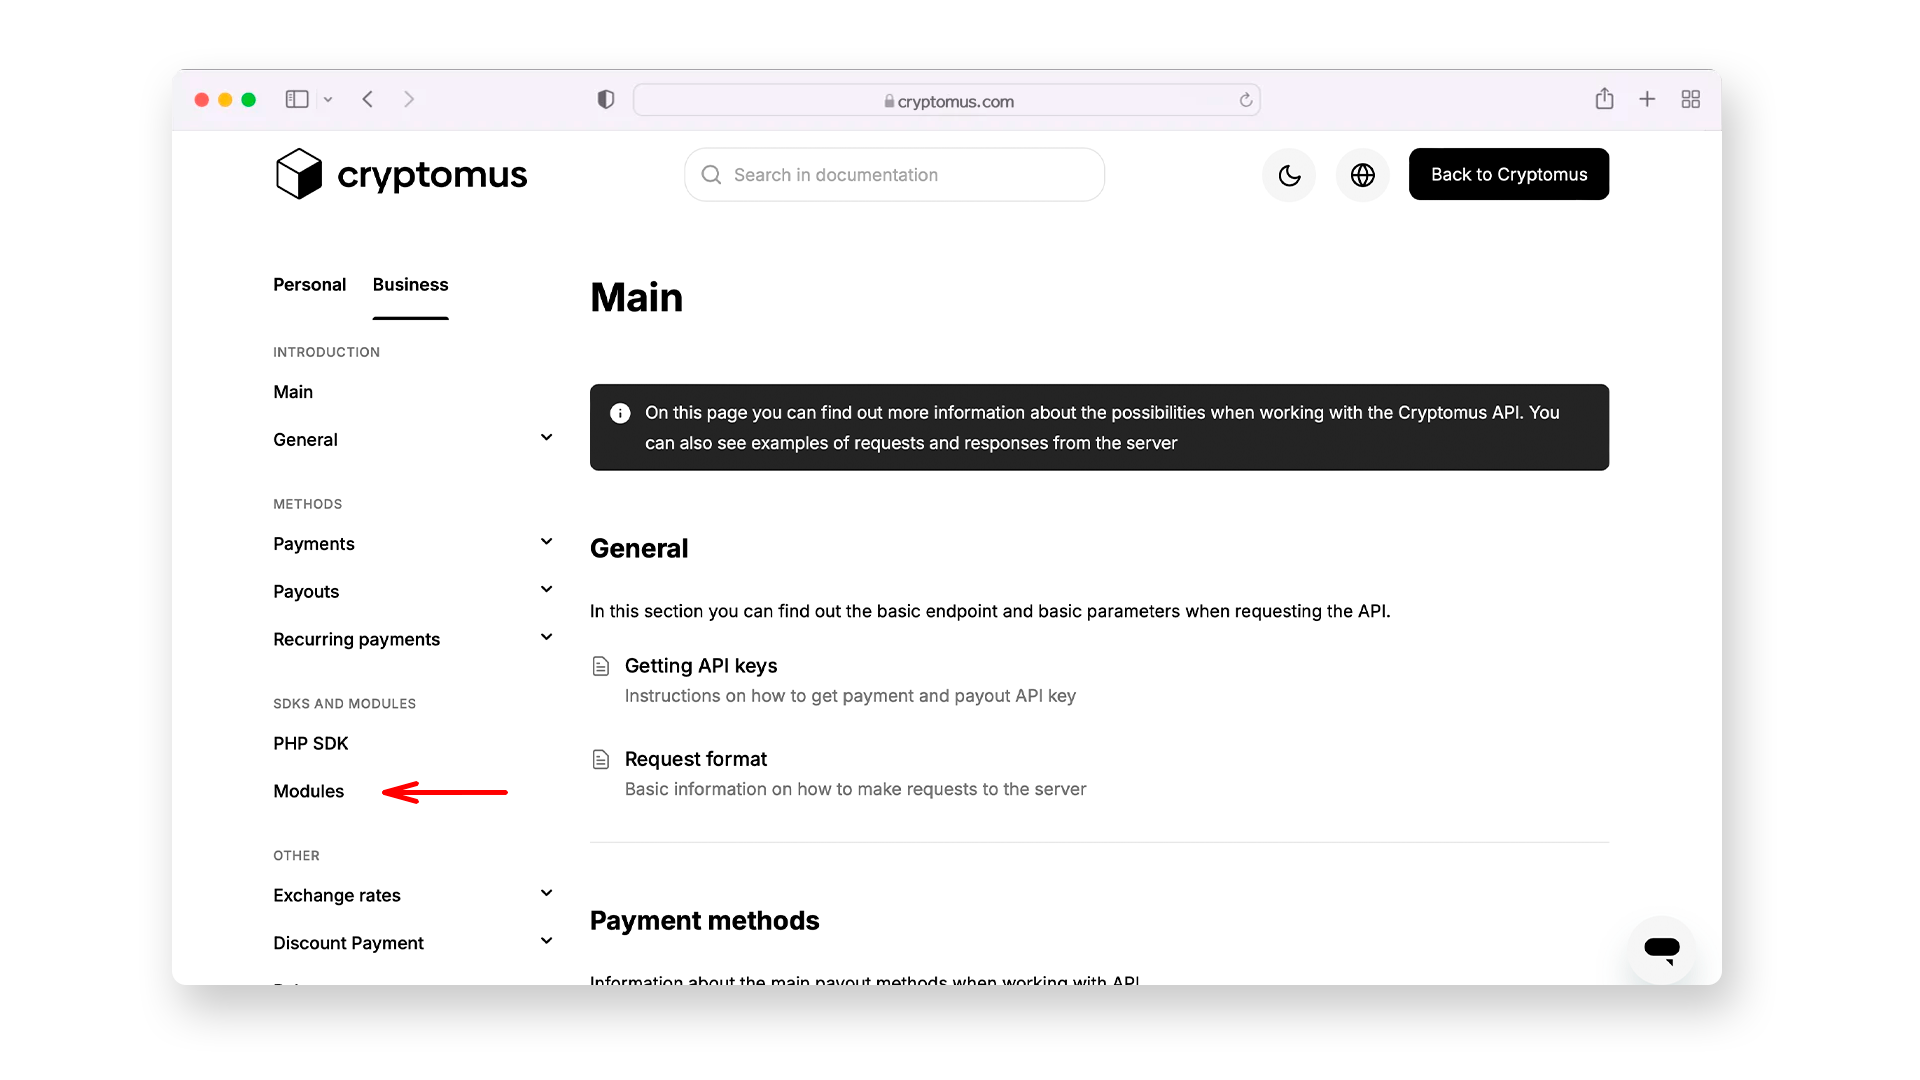
- Look for the WooCommerce plugin and click Download.
Setting Up the Payment Plugin via WordPress Plugin Directory
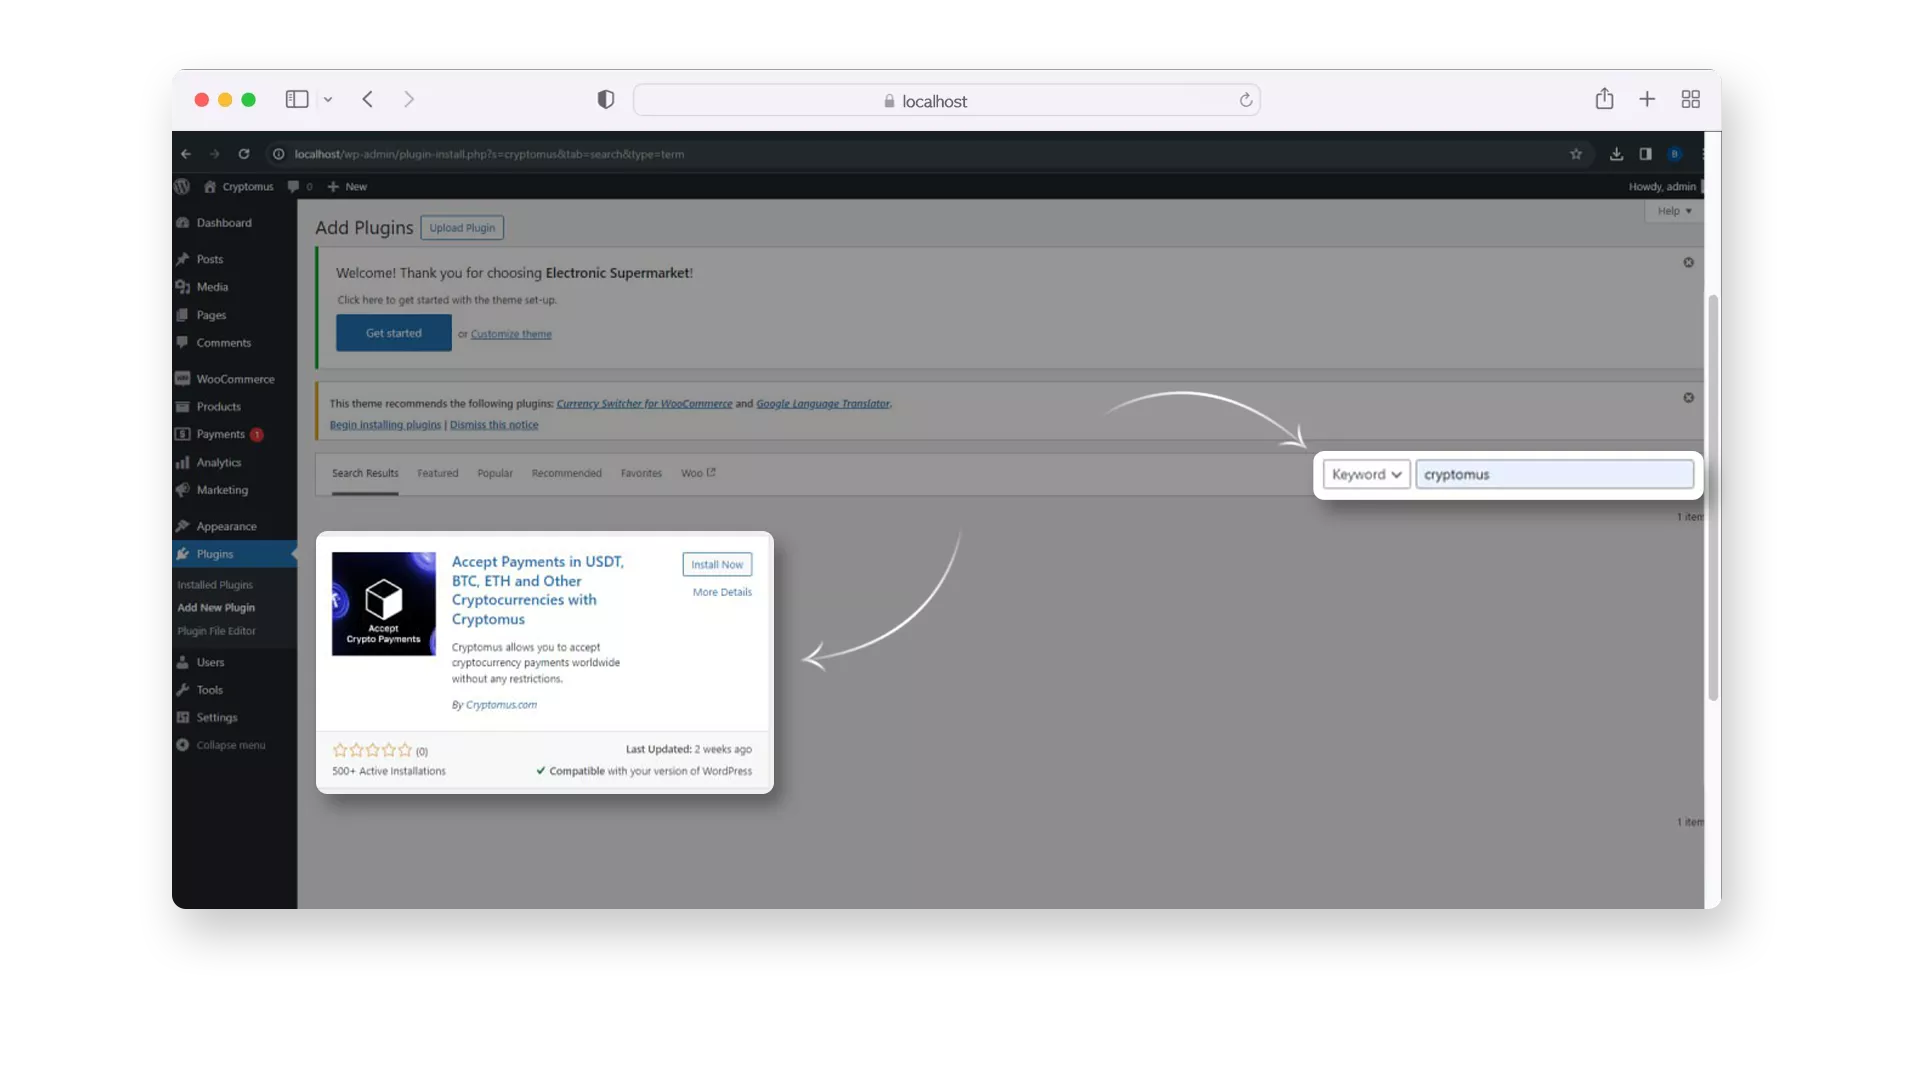
If you're looking for an even easier way to set up the Cryptomus plugin, you can install it directly from the WordPress Plugin Directory through your WordPress admin panel. This method requires minimal effort and can be done in just a few clicks.
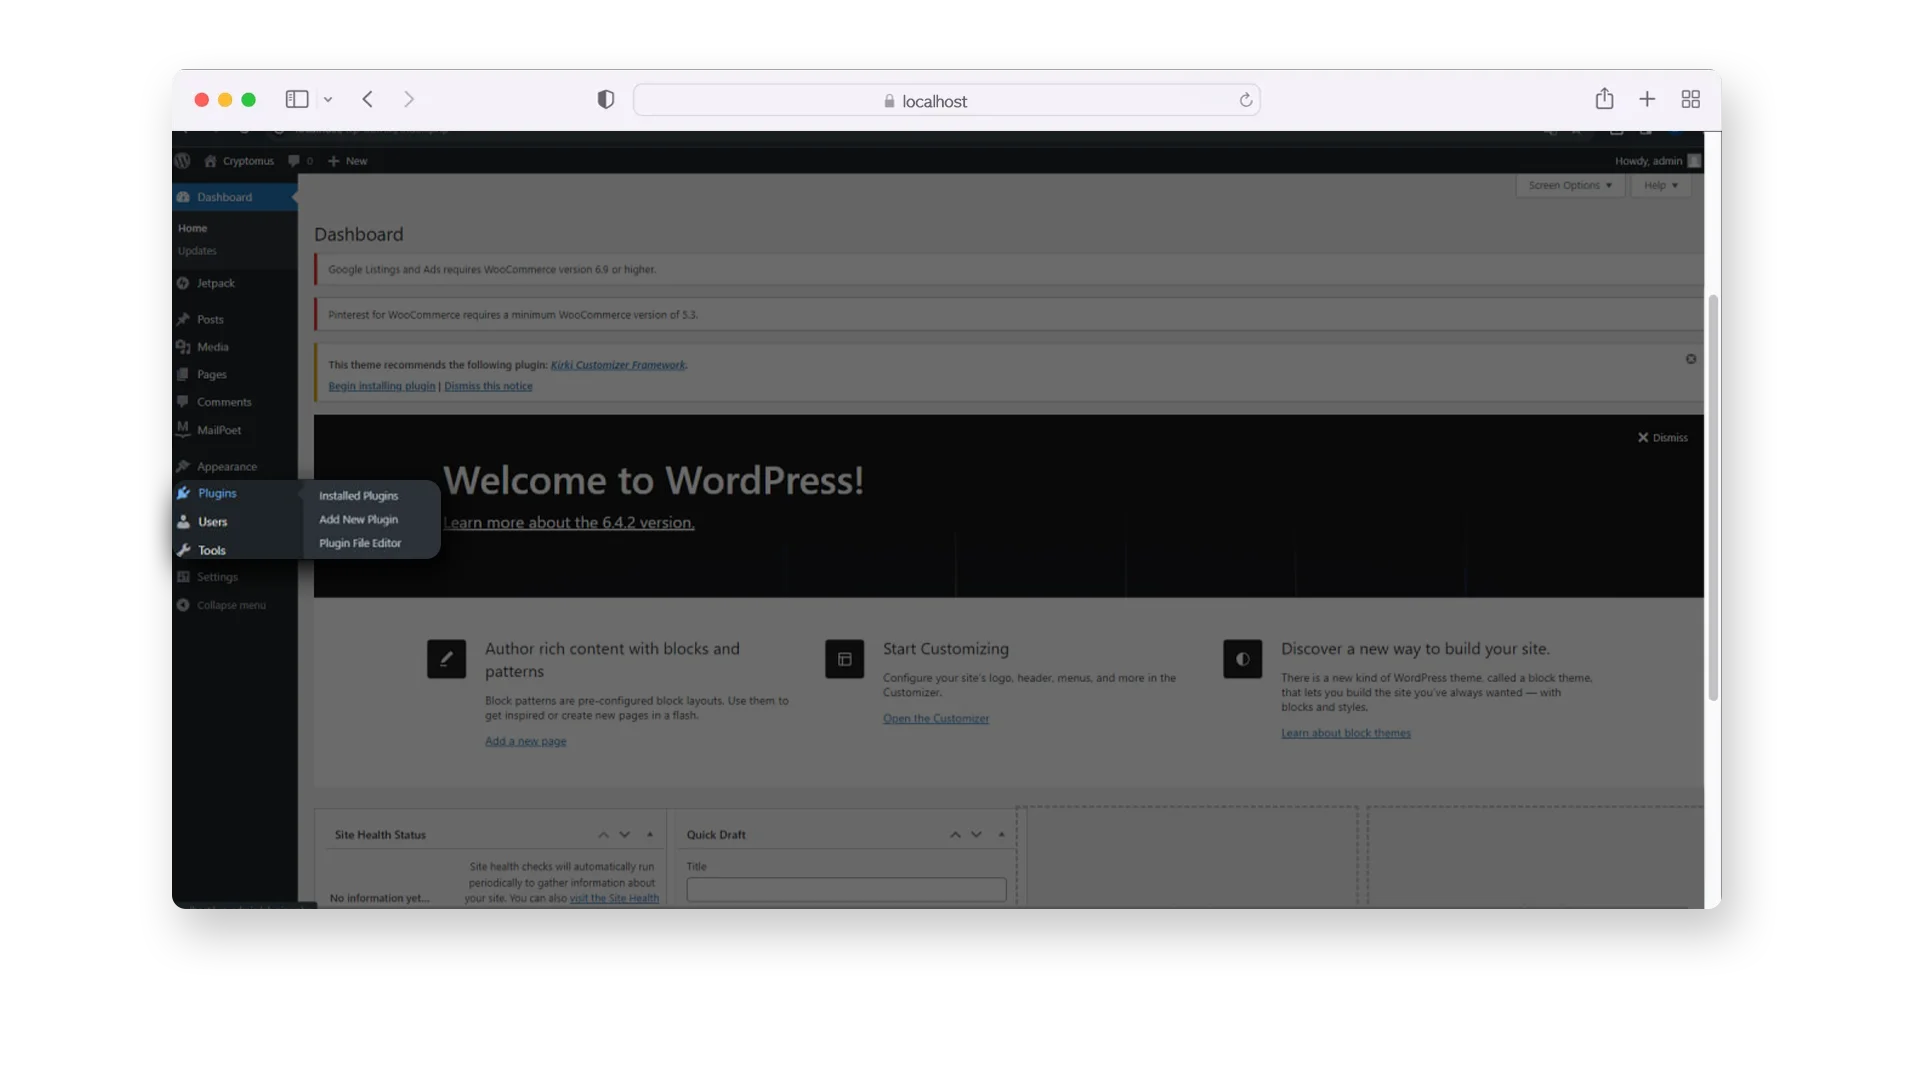
Simply go to the "Plugins" section in your WordPress dashboard, click "Add New", and search for the Cryptomus plugin. Once you find it, just click "Install Now" and the plugin will automatically be added to your website. After installation, you can activate the plugin, configure your settings, and you’re all set to start accepting crypto payments. This method is incredibly quick and user-friendly, making it the most convenient option for most users.
Installing Cryptomus Crypto Payment Gateway for WordPress
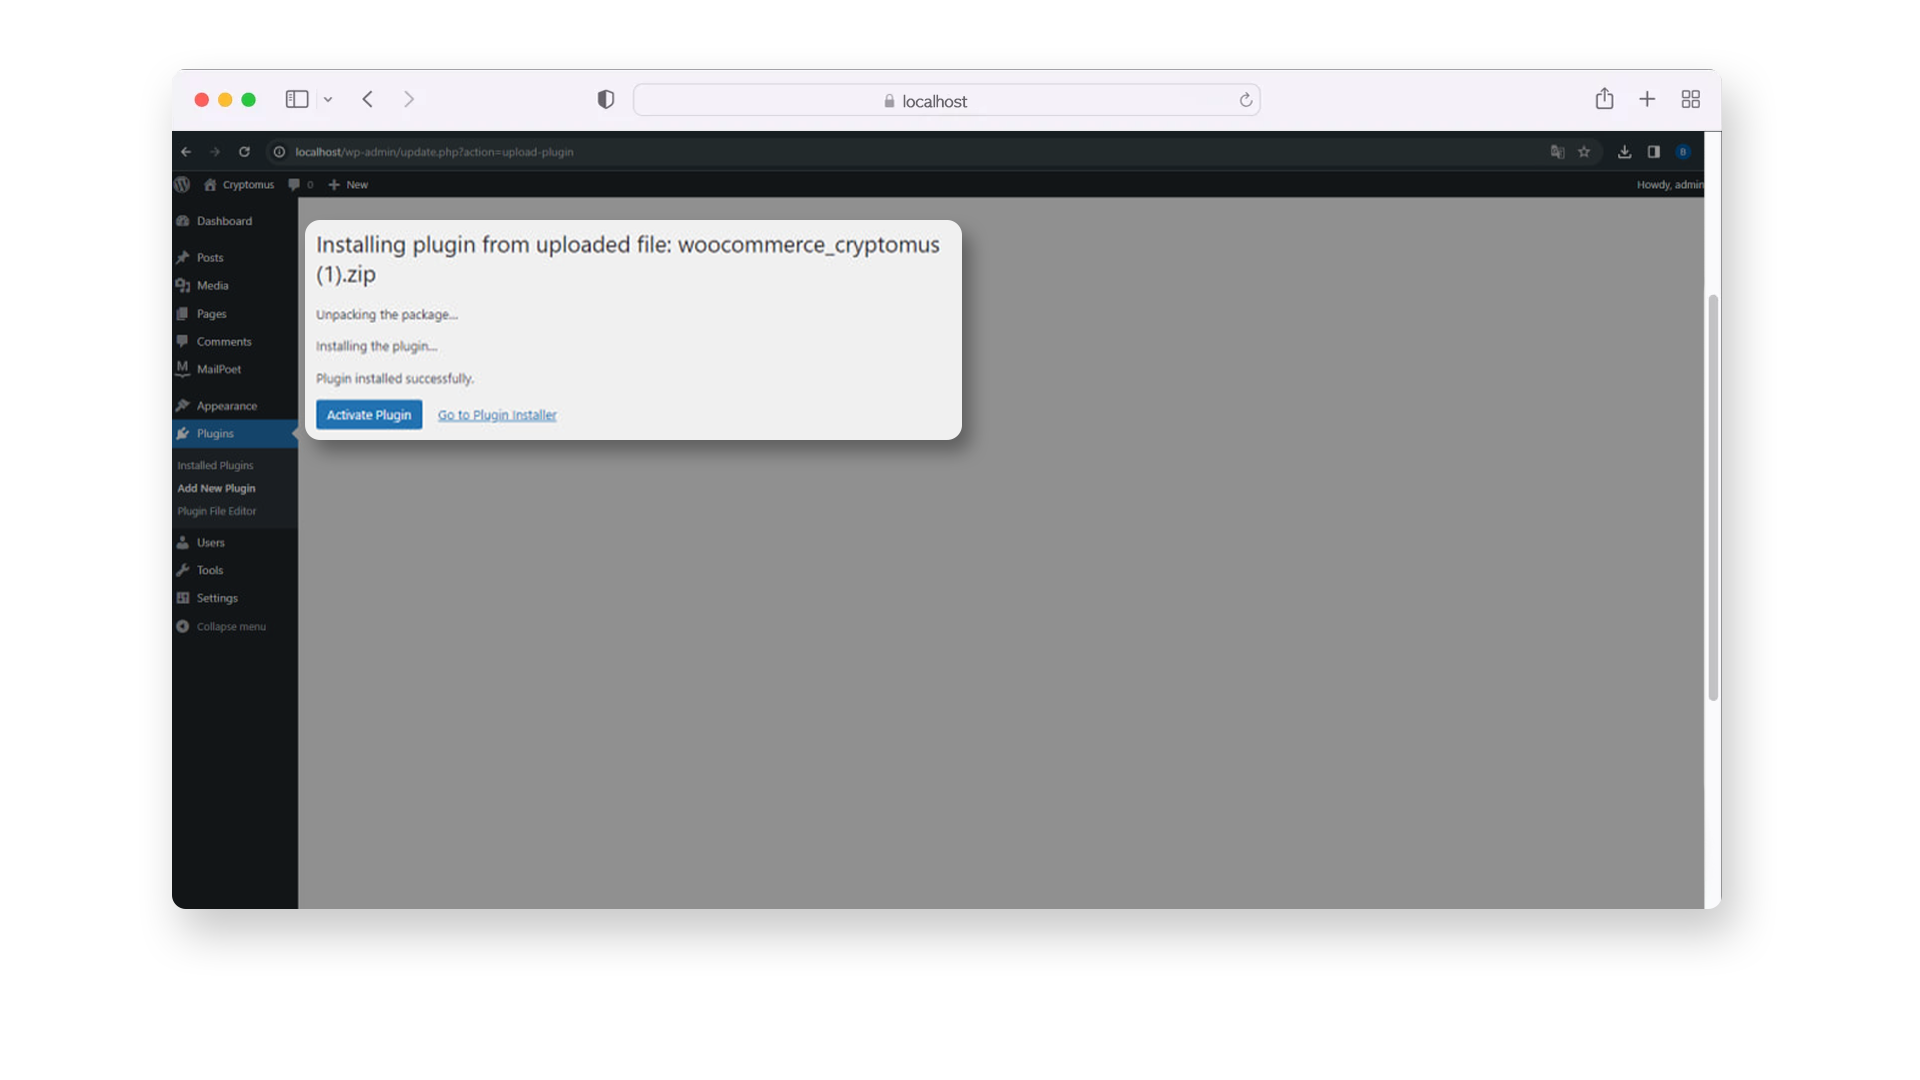
- Navigate to the Plugins tab in your WordPress admin dashboard.

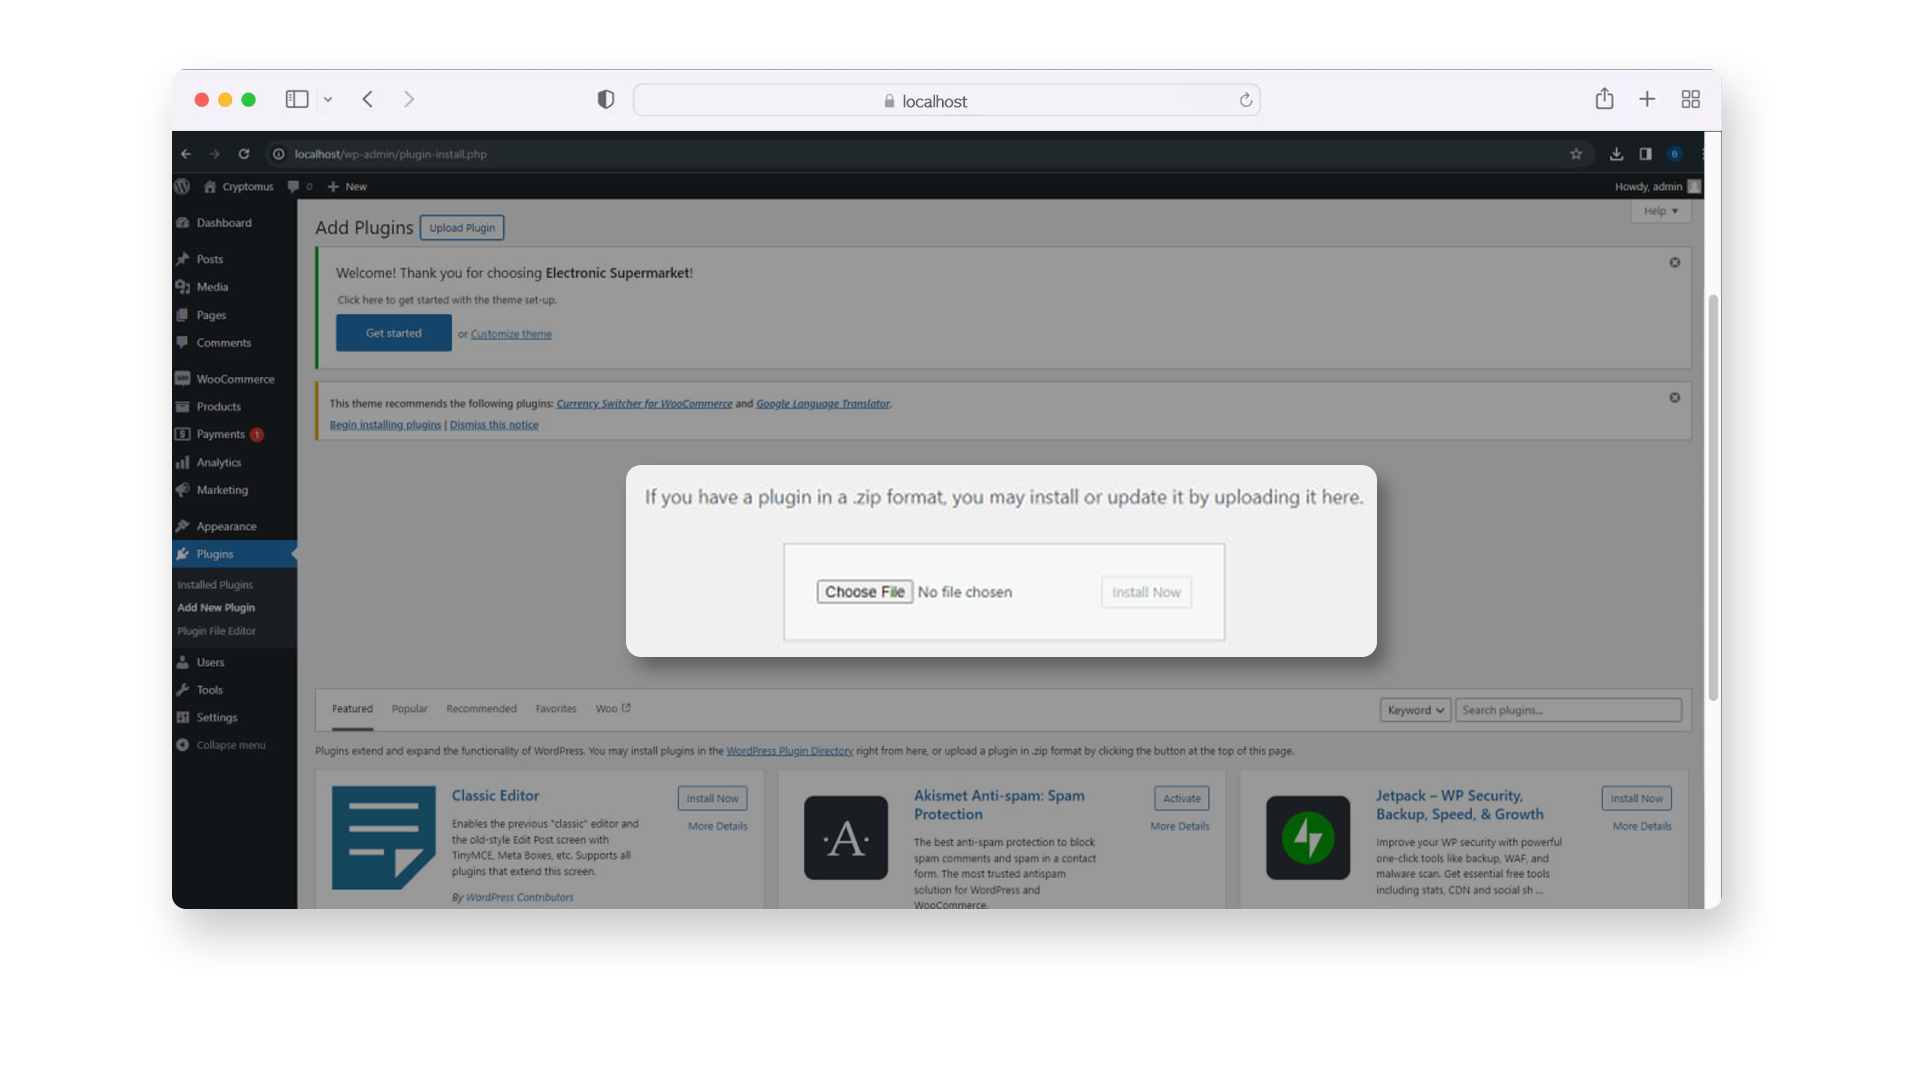
- Upload a plugin and click Install Now, then activate and enable it.
Setting Up Cryptomus Payment Gateway for WordPress via API
For those looking for flexibility and customization, setting up Cryptomus Payment Gateway via API is the perfect solution. It is a more flexible and customizable way that is suitable for experienced developers or projects with special requirements.
We will walk through step by step how to use the Cryptomus API to integrate payments into your WordPress site:
- Log in to your Cryptomus account and create a Merchant for your business, then generate an API key. If you don't have an account, sign up for one.
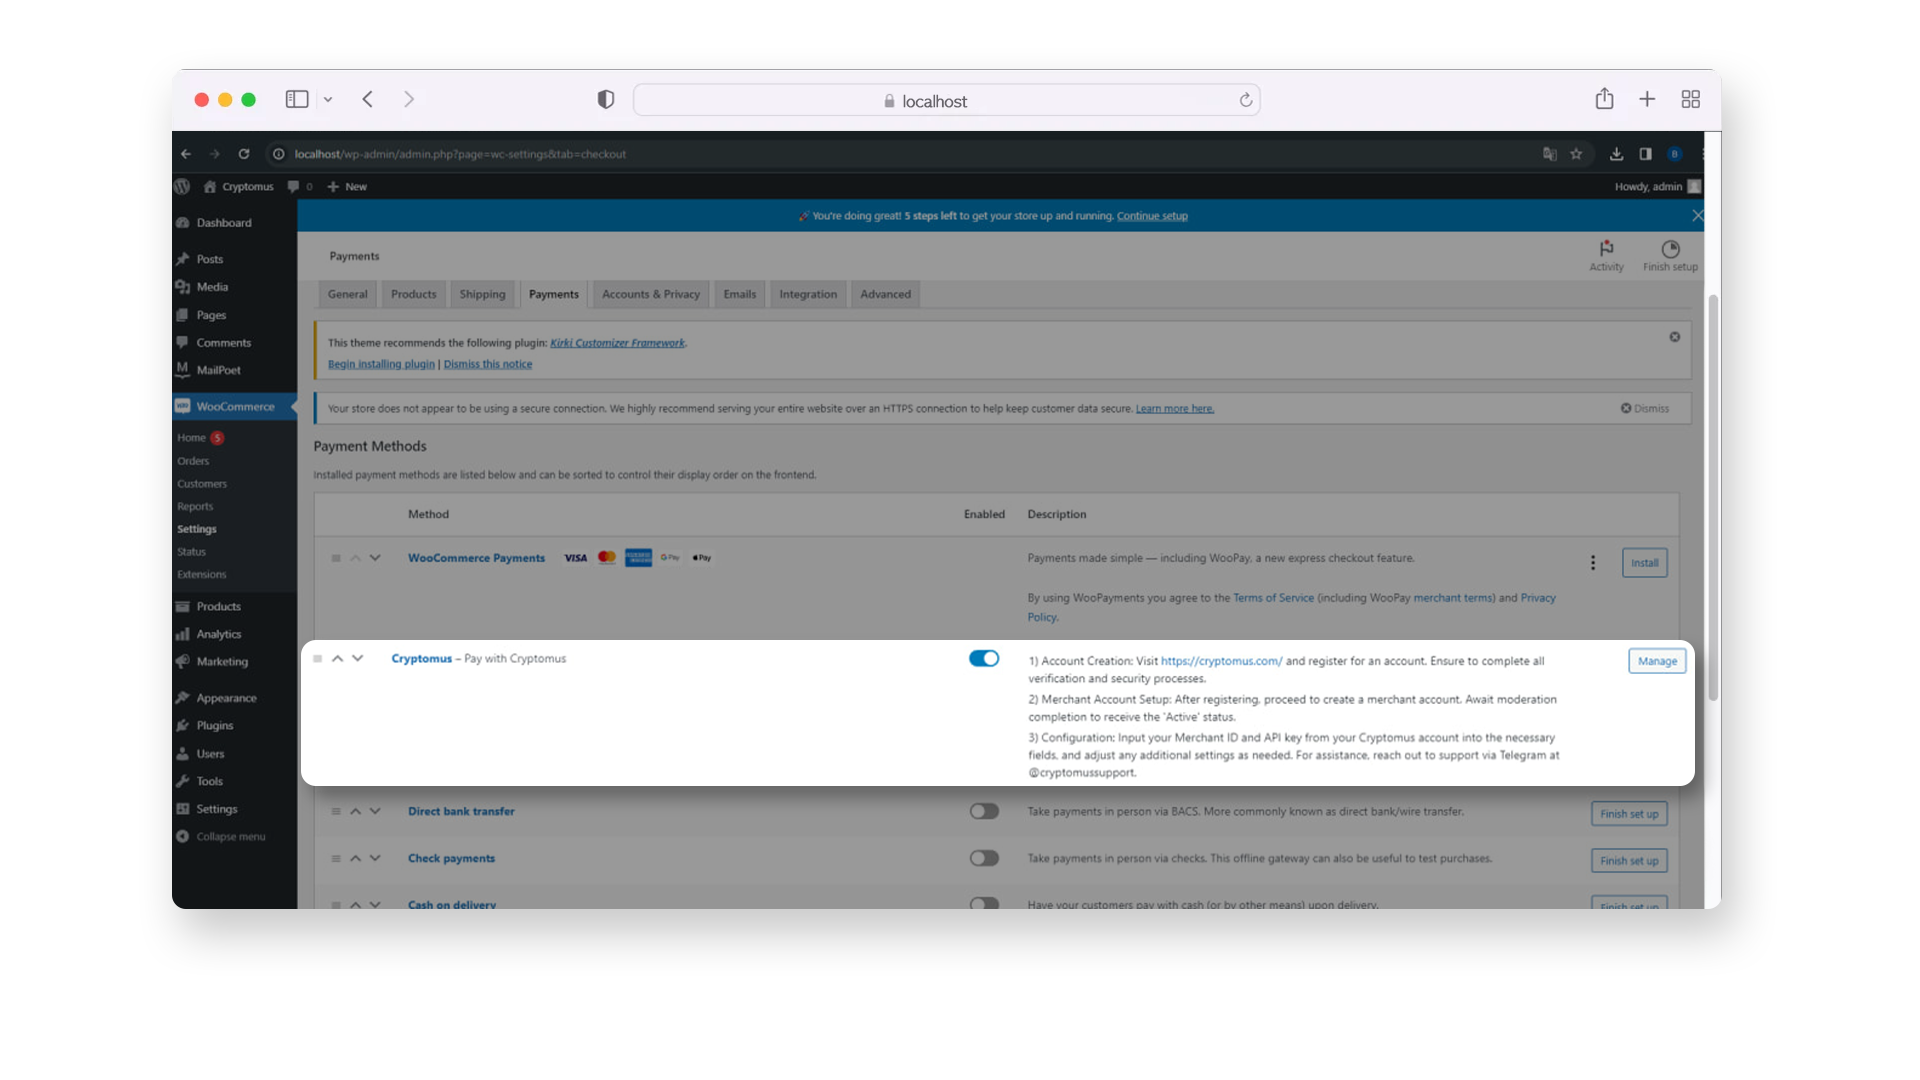
- Enter the API key you generated in your Cryptomus account and configure any other desired settings. Don't forget to enable the WooCommerce plugin in the Payments section of Settings.
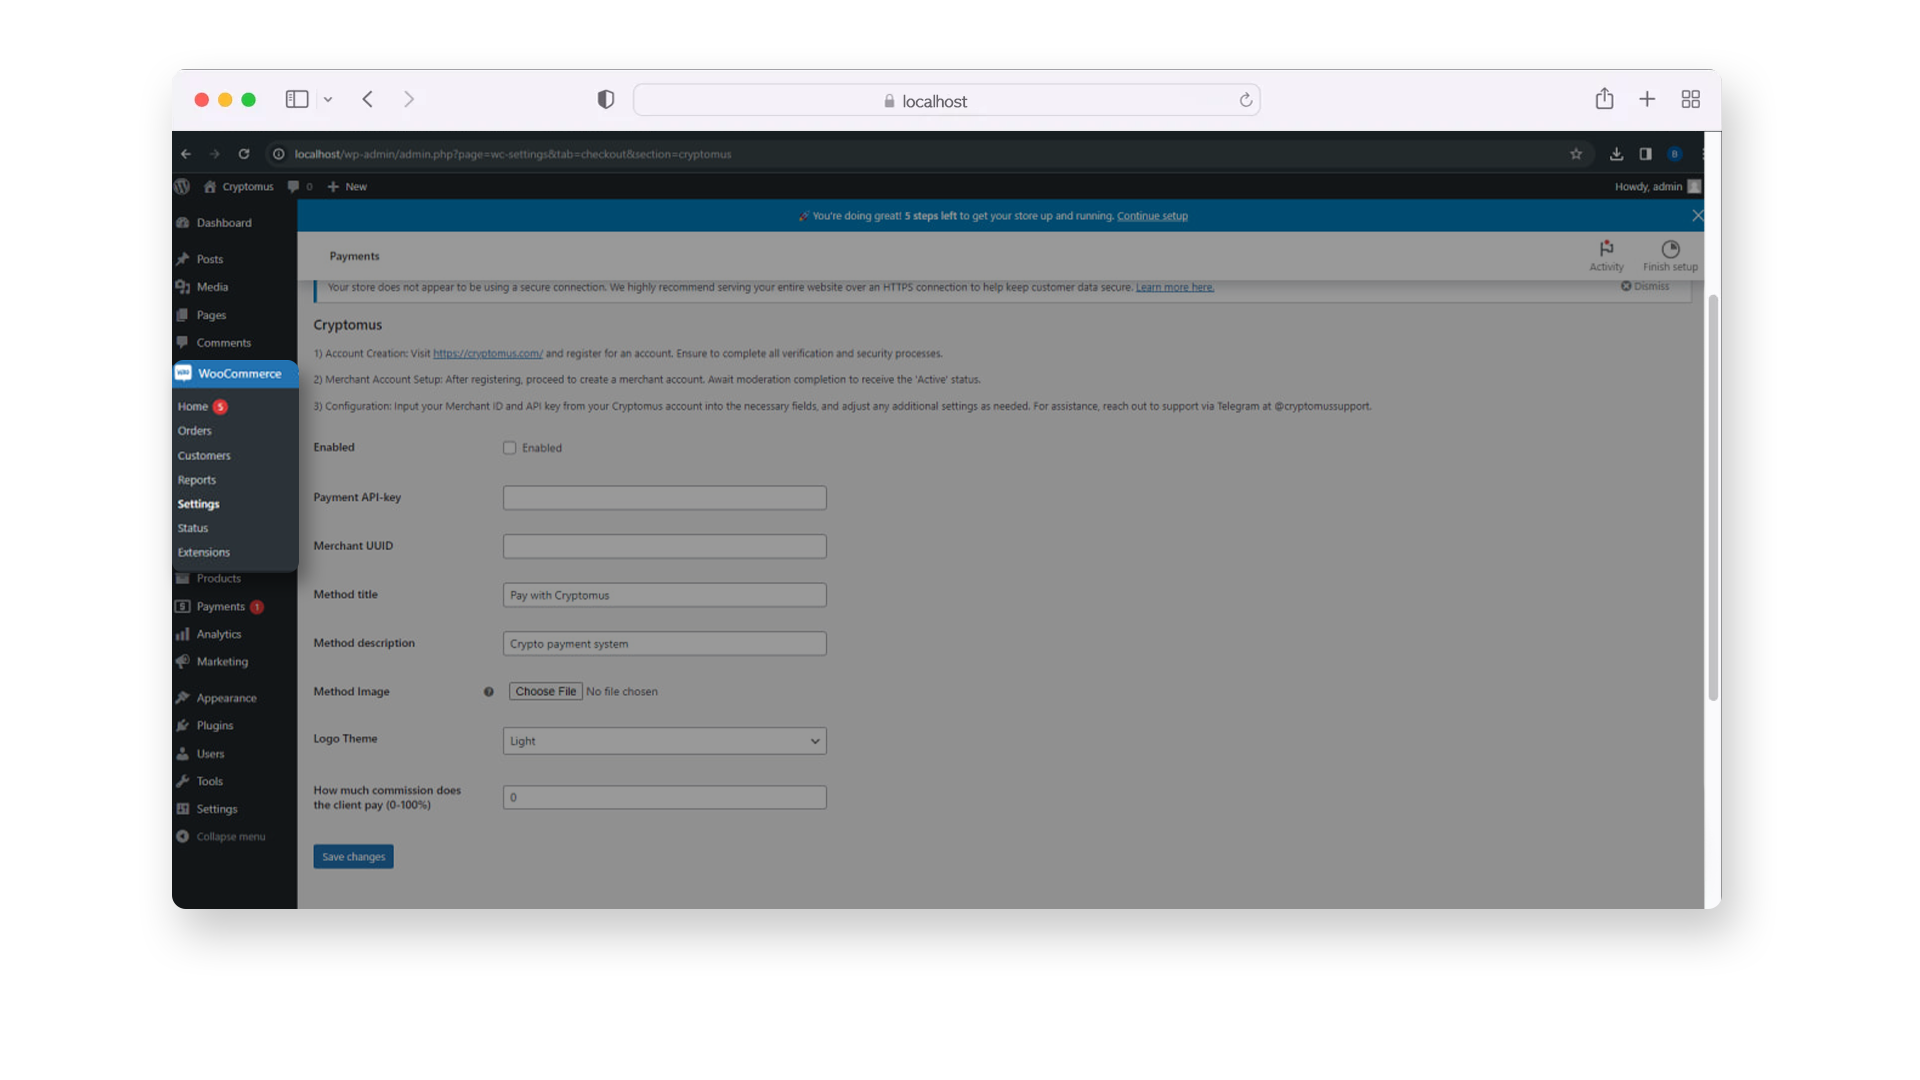
- Click Save changes.
Setting Up a Shortcode
To ensure that the WooCommerce plugin works properly, all that's left to do is place a shortcode block: a short snippet of code created for WordPress, so that you have the ability to embed files or create objects on your website or blog.
-
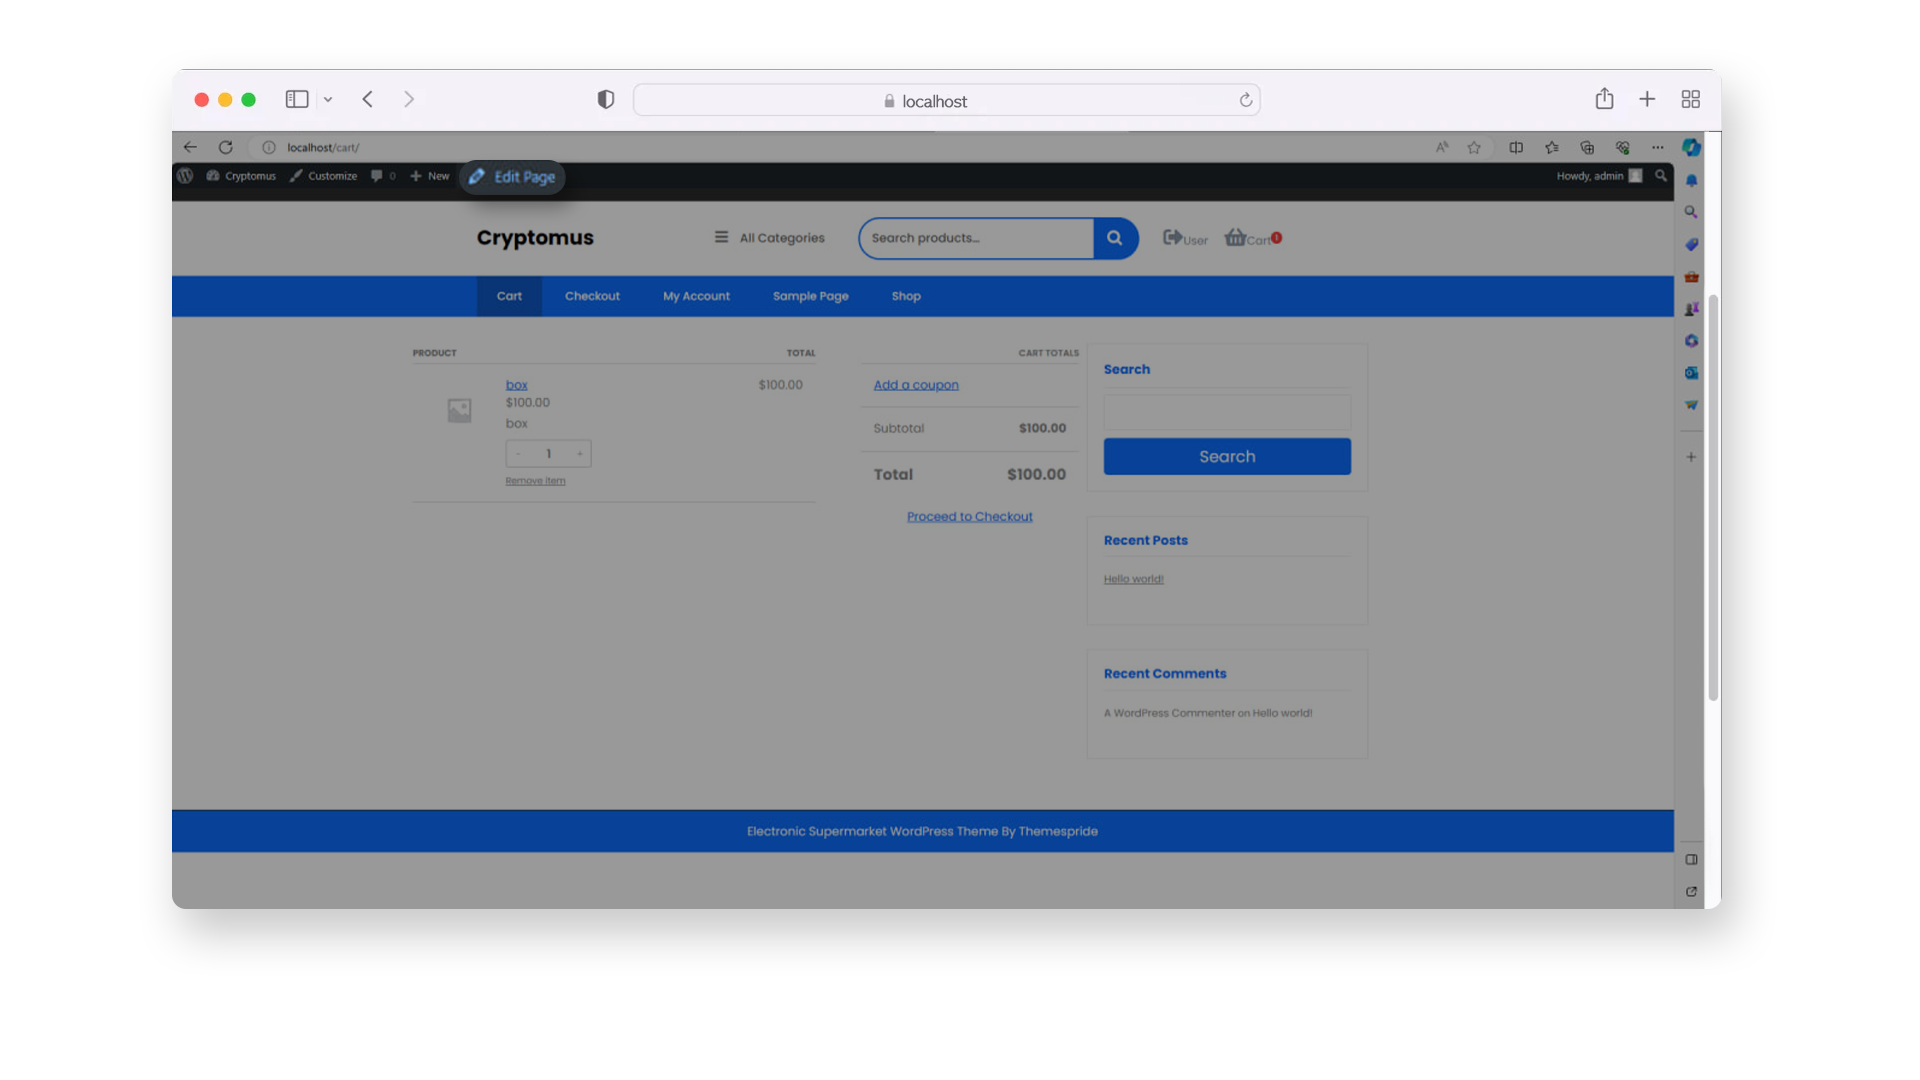
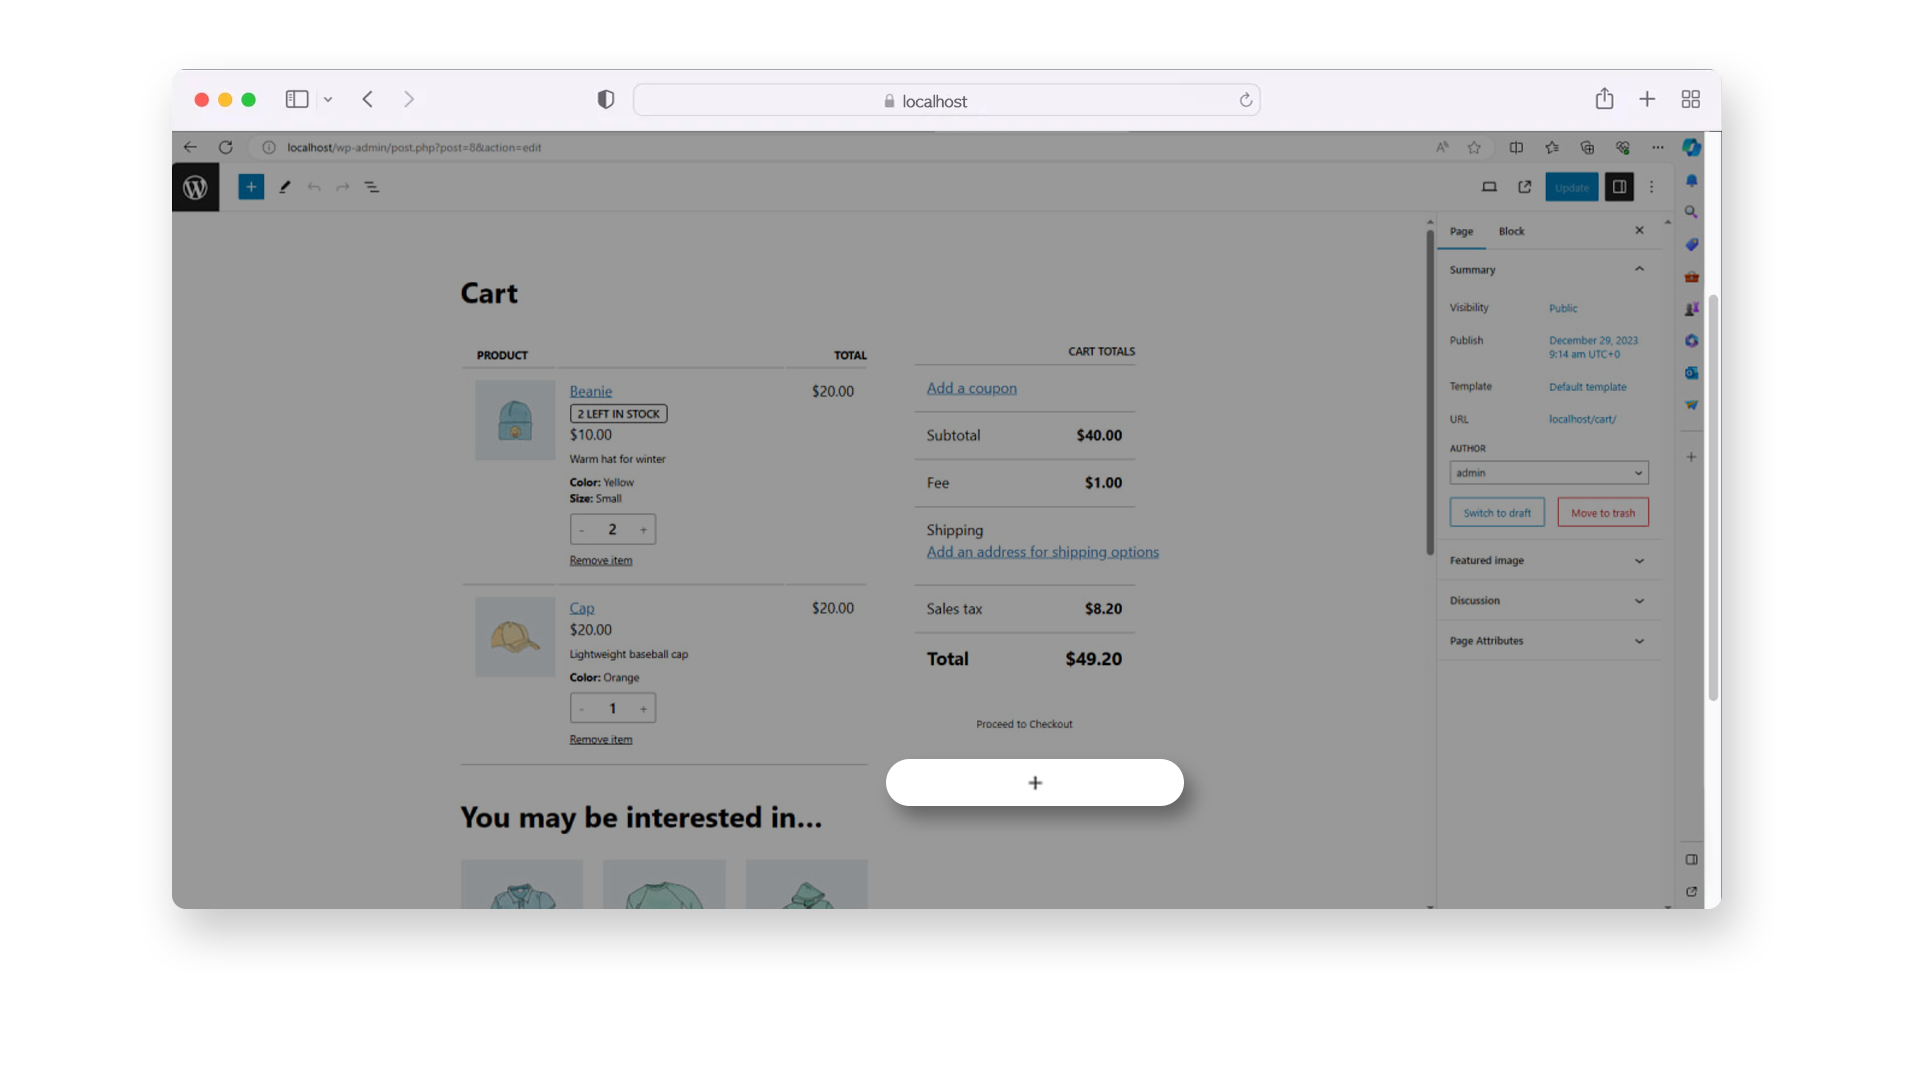
Go to the page editor by clicking Edit Page.
-
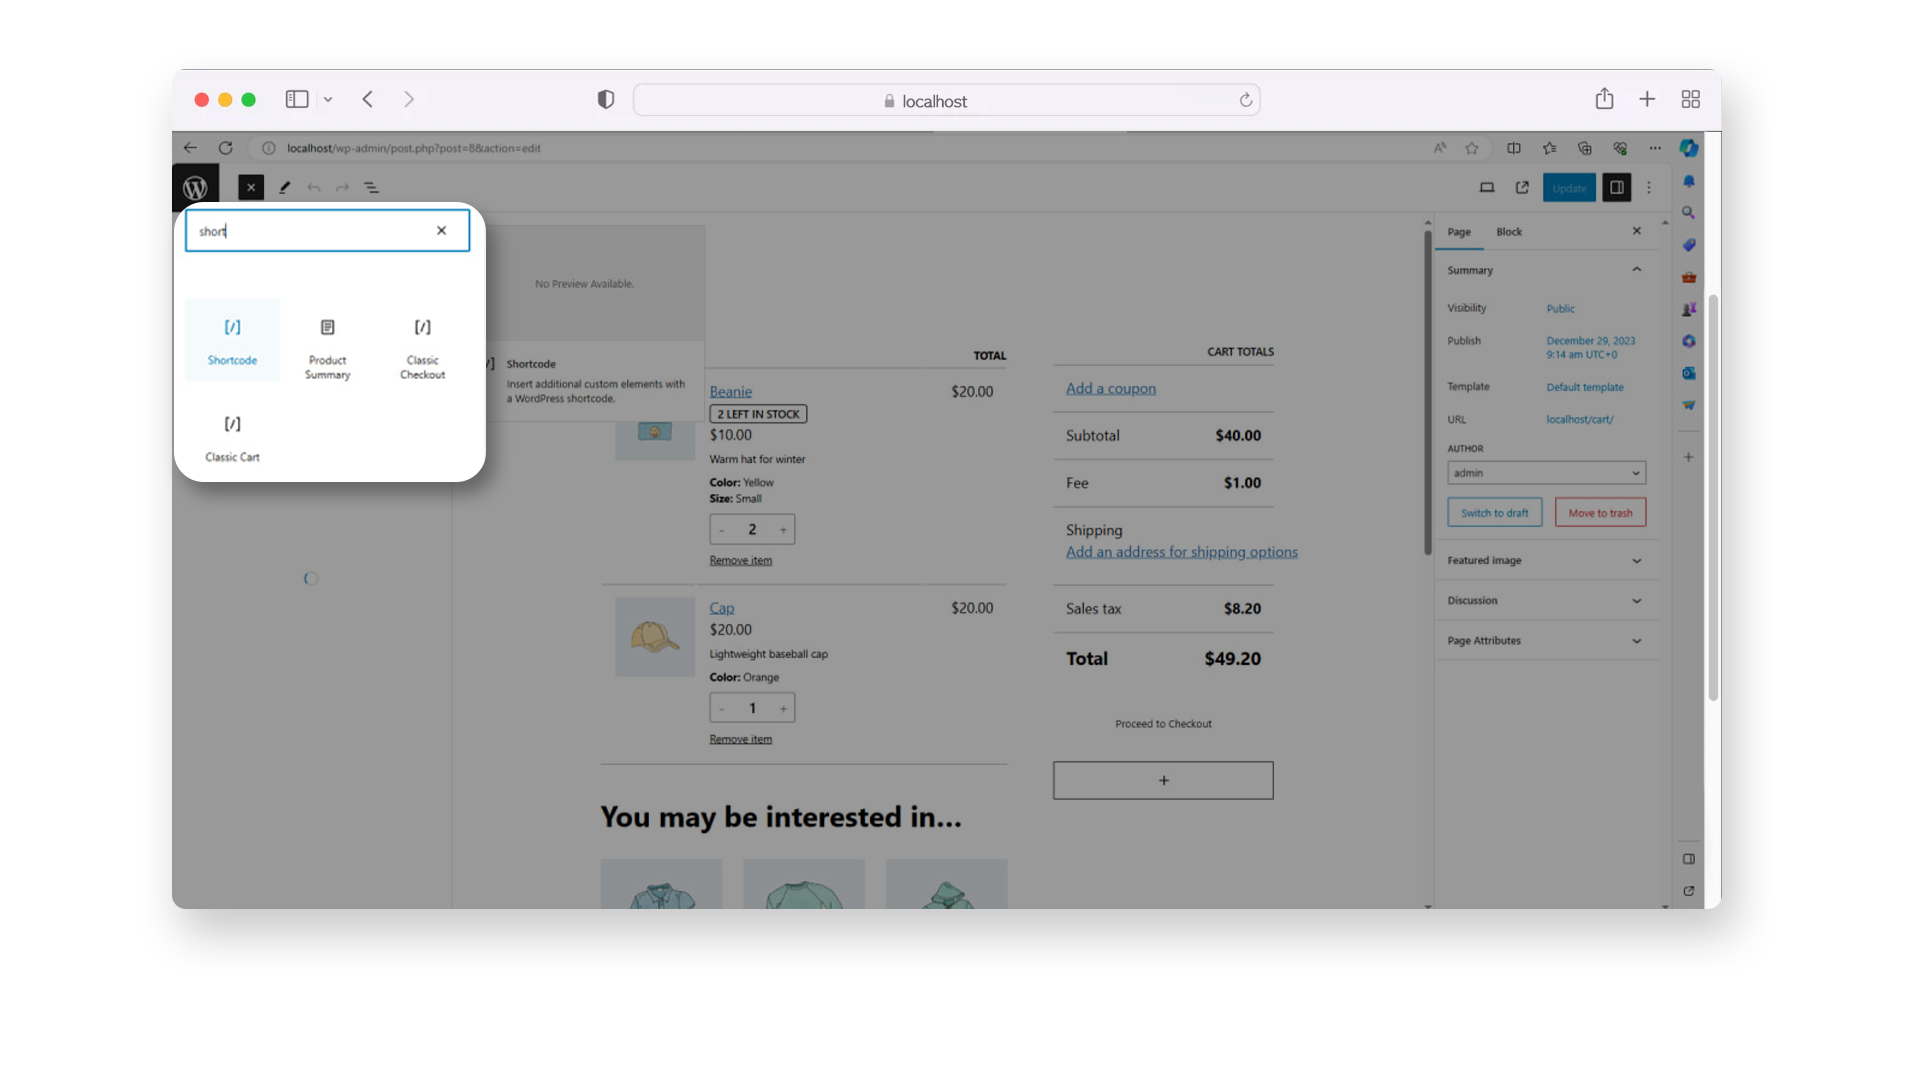
Once inside the page editor click on + and add a shortcode block.
-
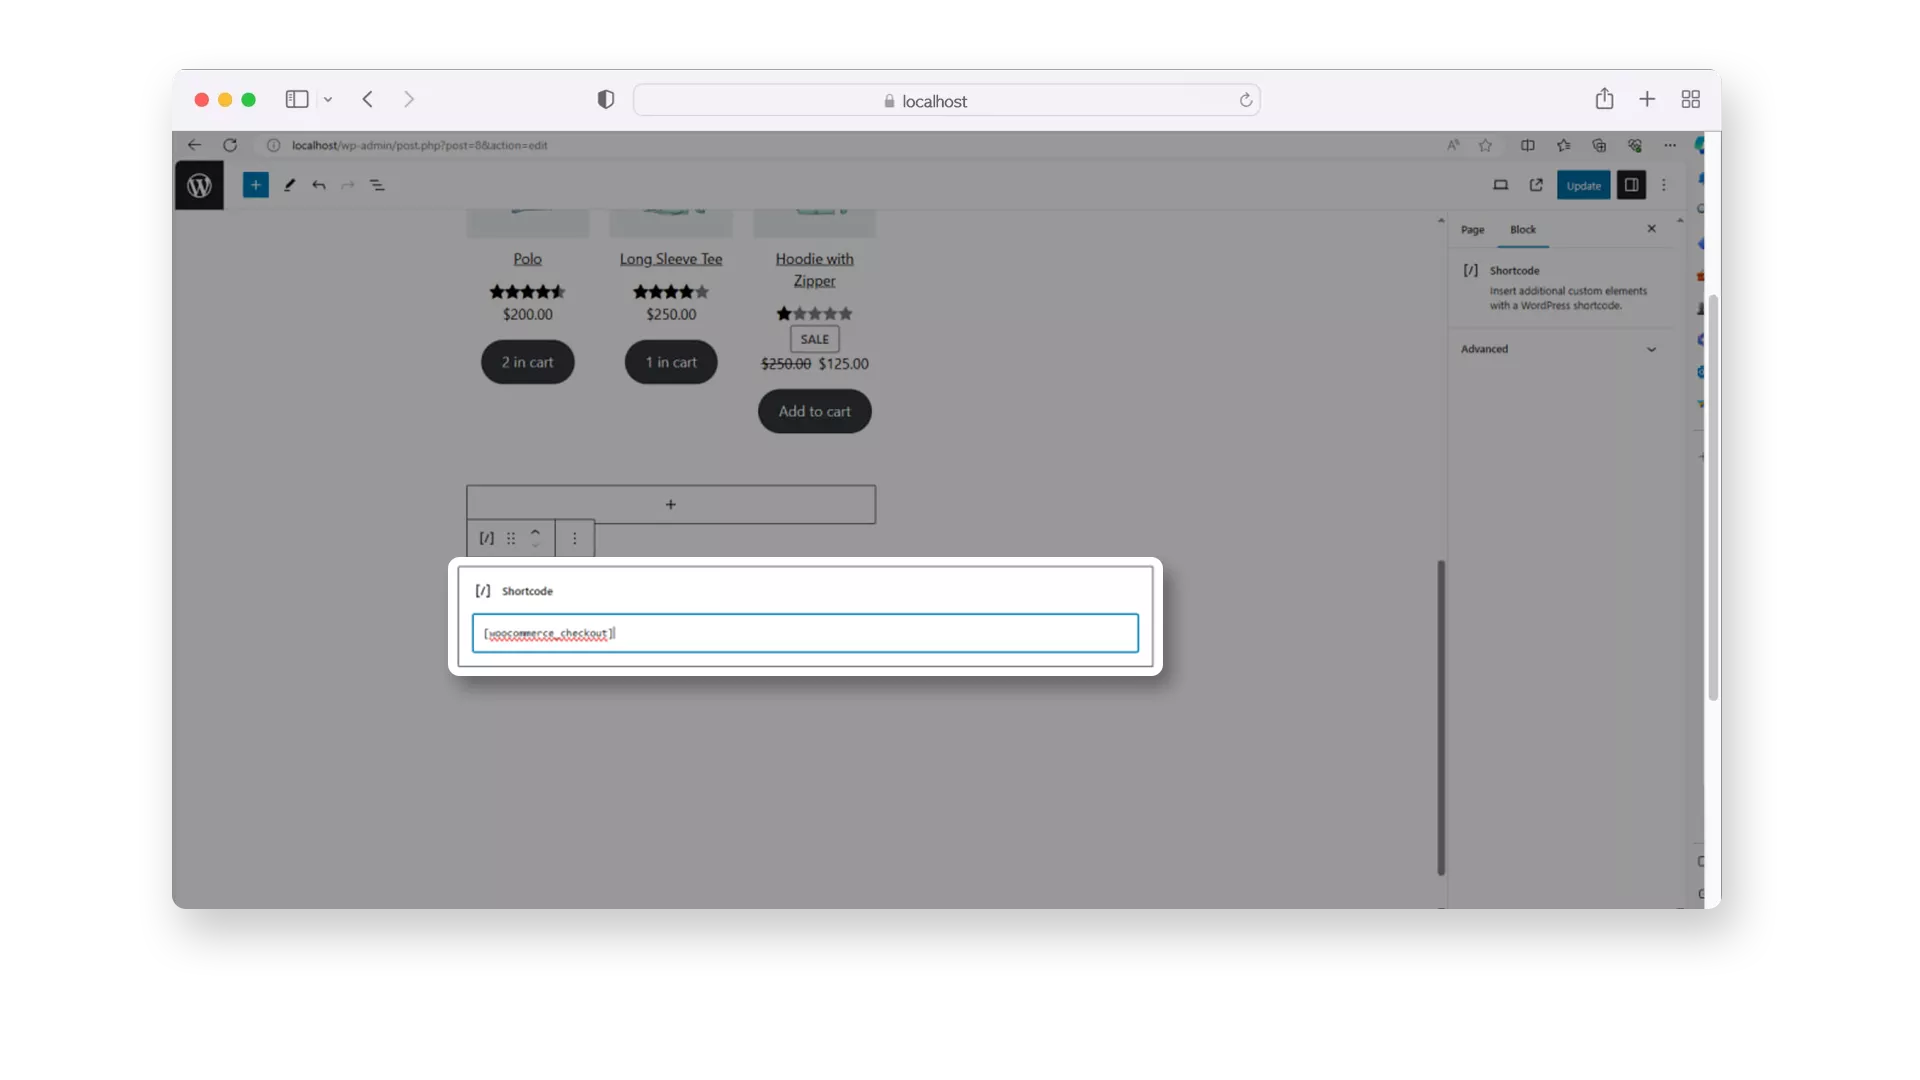
Type woocommerce_checkout into the added shortcode block so that the end result is: [woocommerce_checkout].
- Update the changes.
New Options of WooCommerce Payment Plugin
In the new version of the plugin, a new Host-to-Host setting has been added. This setting will allow you to remove the mention of Cryptomus from your website.
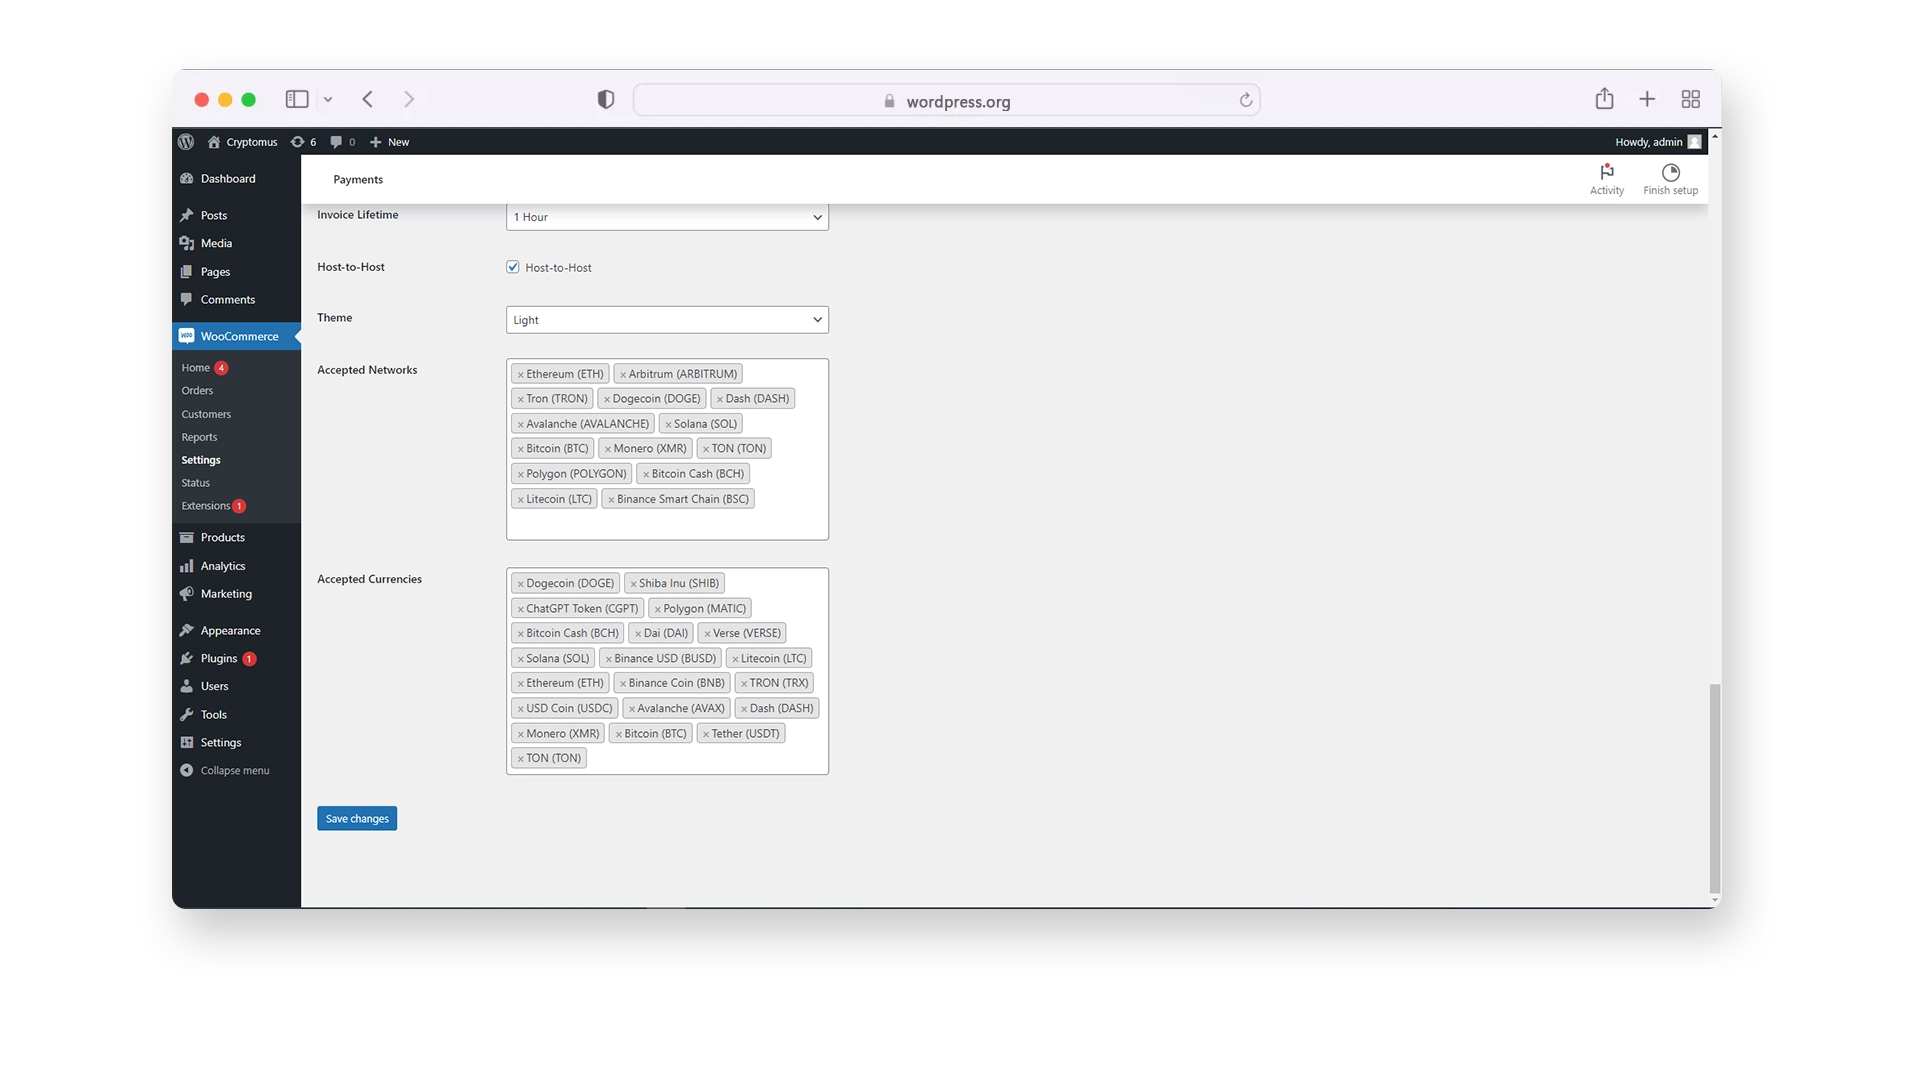
The Theme setting is responsible for choosing the theme. There are pre-installed options, but we recommend creating your own one.
To do this, select ‘Custom’ and go to the following path: ‘wp-content → plugins → cryptomus → templates → custom’. Then edit the PHP files form_1.php and form_2.php. Be careful not to change the names of the form fields.
The Accepted Networks and Accepted Currencies settings allow you to select a set of coins and networks in which you want to accept payments on your website.
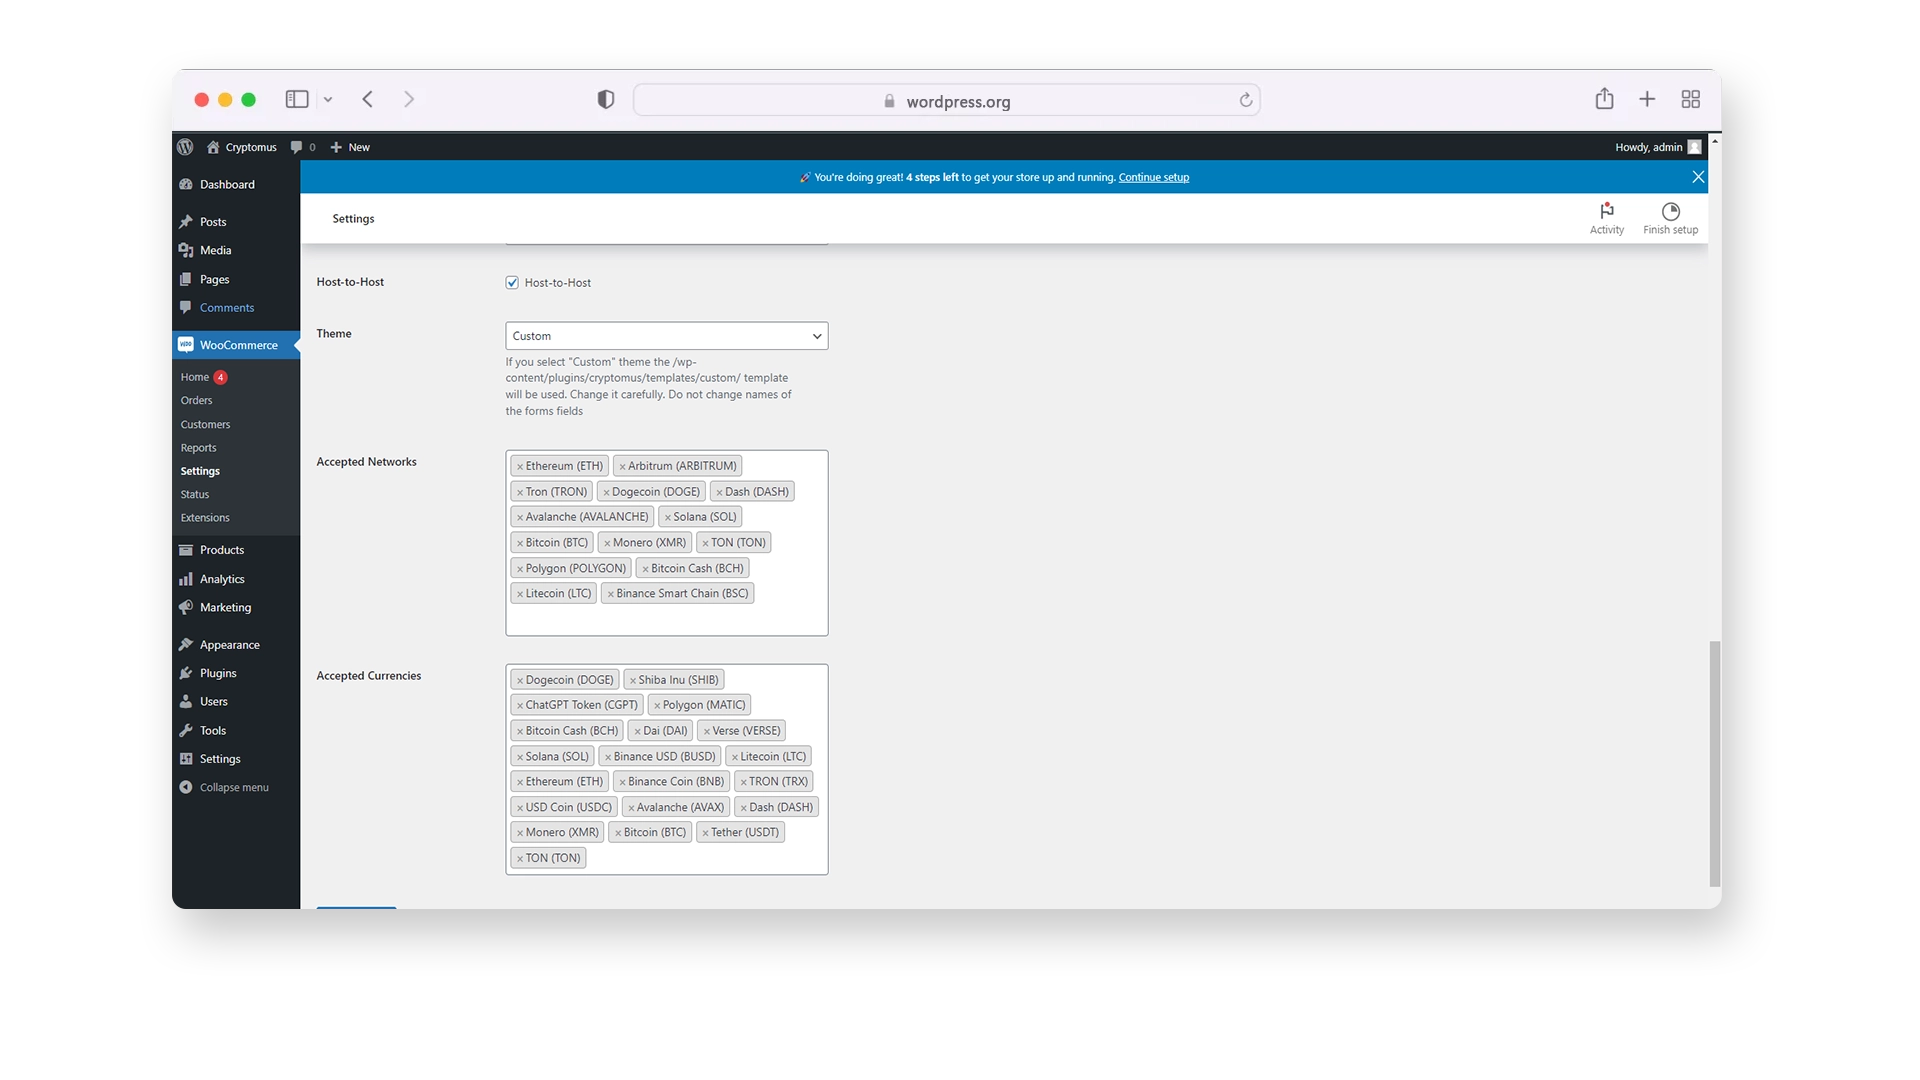
Done! To make sure everything works fine, consider doing some testing payments. Incoming crypto funds will be debited to your merchant account.
Now, your WordPress website is ready to accept cryptocurrency payments through WooCommerce and the Cryptomus payment gateway. If there are any questions left, feel free to contact our support team. Happy selling!
Solutions for Different Platforms
If you're using other platforms for your online business, we’ve got you covered. Below is a list of our available plugins for various systems:
| Platform | Tutorial | |
|---|---|---|
| WooCommerce | TutorialClick Here | |
| WHMCS | TutorialClick Here | |
| PrestaShop | TutorialClick Here | |
| OpenCart | TutorialClick Here | |
| BillManager | TutorialClick Here | |
| RootPanel | TutorialClick Here | |
| XenForo | TutorialClick Here | |
| PHPShop | TutorialClick Here | |
| Tilda | TutorialClick Here | |
| Shopify | TutorialClick Here | |
| Clientexec | TutorialClick Here | |
| Webasyst | TutorialClick Here | |
| Easy Digital Downloads | TutorialClick Here | |
| HostBill | TutorialClick Here | |
| Magento 2 | TutorialClick Here | |
| Invision Community | TutorialClick Here | |
| Azuriom | TutorialClick Here | |
| Blesta | TutorialClick Here | |
| BigCommerce | TutorialClick Here | |
| WISECP | TutorialClick Here | |
| CS-Cart | TutorialClick Here | |
| WatBot | TutorialClick Here | |
| Amember | TutorialClick Here | |
| Joomla VirtueMart | TutorialClick Here |
We hope this guide clarified how crypto payments can be integrated into your WooCommerce store and why they’ve become an important part of modern online commerce. By offering cryptocurrency as a checkout option, you make your store more accessible worldwide, reduce payment friction, and strengthen your operational flexibility. Implementing a crypto payment plugin is a practical step toward improving your customer experience and keeping your business ahead in a digital-first economy.
Simplify Your Crypto Journey
Want to store, send, accept, stake, or trade cryptocurrencies? With Cryptomus it's all possible — sign up and manage your cryptocurrency funds with our handy tools.
Get Started
