
Logan Brooks
Crypto expert explaining blockchain technologies in a clear and accessible way.
How to Accept Cryptocurrency Payments with Tilda
Table of Contents
20 years ago the idea of creating a website and running an online business was almost unthinkable, firstly because of the lack of tools and secondly because of the difficulty of creating a website at that time, the only method was to code everything by hand with good old html and css, so to have a website you had to pay someone or learn to code.
Nowadays, with the advent of CMS, you don't need to be a coding pro to make a website - all you need to do is pick a template, modify it, and you've got your website.
But one problem remains: integrating payment systems into websites. This crucial step remains a challenge for many online businesses. Implementing a secure, user-friendly and reliable payment system is essential to guarantee a positive user experience and facilitate transactions.
And with the advent and democratization of cryptocurrencies, this adds a new challenge: how to easily integrate crypto into payment pages.
As you can imagine, the reason I'm writing this article is that I've found the most effective solution that combines website creation and crypto payment integration. Introducing "Tilda", with which you can easily integrate an optimized and functional payment system into your business and start making money with crypto transactions!
But before I tell you how to do all this, it's important to understand what Tilda is, how it works, and why, and at the end of this article I'll give you a bonus step-by-step guide to integrating it in just a few clicks.
What is Tilda?
Tilda is one of those revolutionary tools that I told you about, a CMS . it offers ready-to-use templates and styles, so you don't have to start from scratch. Whether you want a blog, an online store, or any website, Tilda makes it easy for anyone to create one without needing technical knowledge.
Tilda also provides a plugin for crypto payment, which means you can accept payments in cryptocurrencies on your website. With this feature, your customers can use digital currencies like Bitcoin or Ethereum to make purchases or pay for services.
Now that you know what is Tilda let me tell you why you need to choose it.

Why to Use Tilda?
Tilda's latest innovation is the Tilda plugin, a simple solution for accepting cryptocurrency payments on your website, just integrate the plugin and your customers can easily pay with digital currencies. It's a modern and secure payment option that is becoming increasingly popular.
Now it is time for me to give you that step-by-step instruction I told you about.
Step-by-step Guide
Before we start, please sign up or log in to Cryptomus and create a merchant. If you are not familiar with how to create a merchant, please read it here.
Step 1: Sign Up
- Go to the Tilda website and click on the "Register" or "Sign Up" button to create a new account.
- Provide all the required information to complete the registration process, this may include your name, email address, and password.
Step 2: Access the Dashboard and Payment System
- Access the Dashboard and Payment System.
- Log in to your Tilda account using the credentials you just created.
- Once logged in, you will be directed to your Tilda dashboard. Go to Payment System section there.
Step 3: Navigate to Custom Payment Gateway
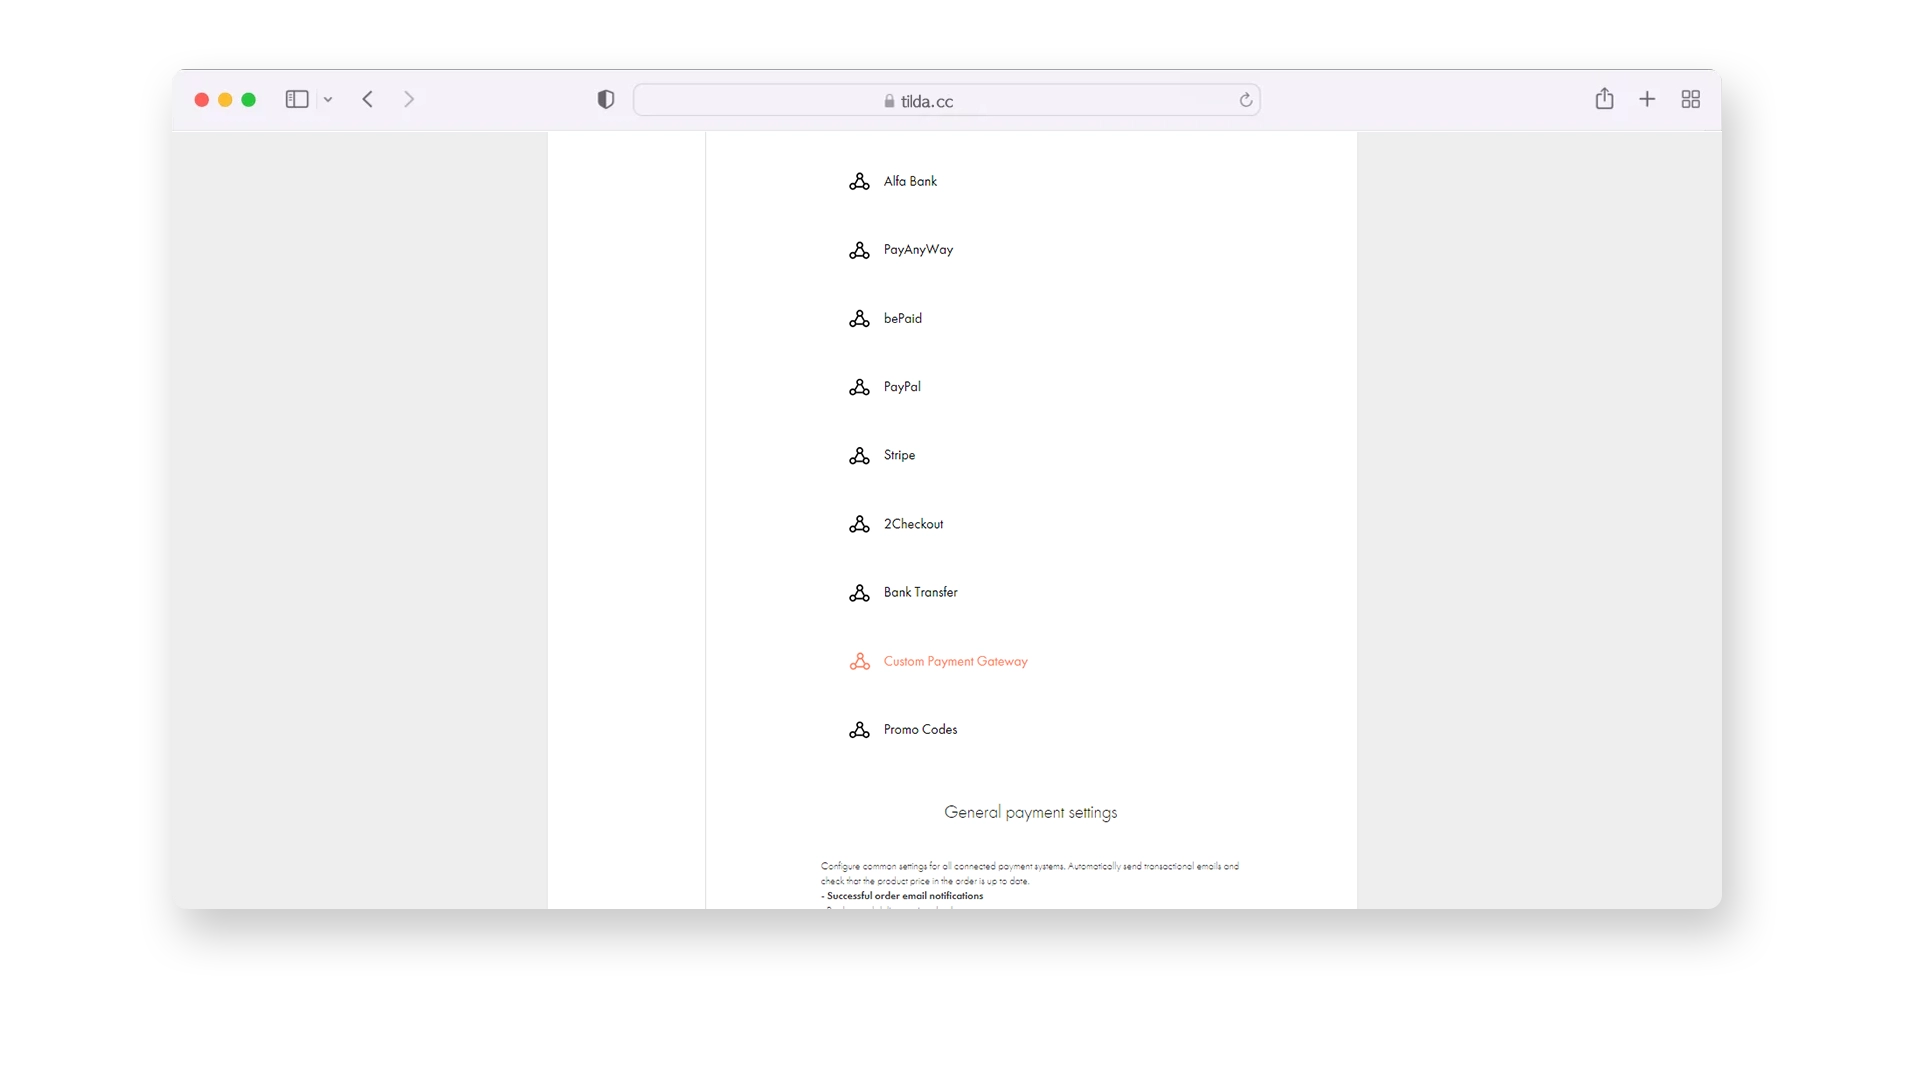
- Select the “Custom payment gateway” item.
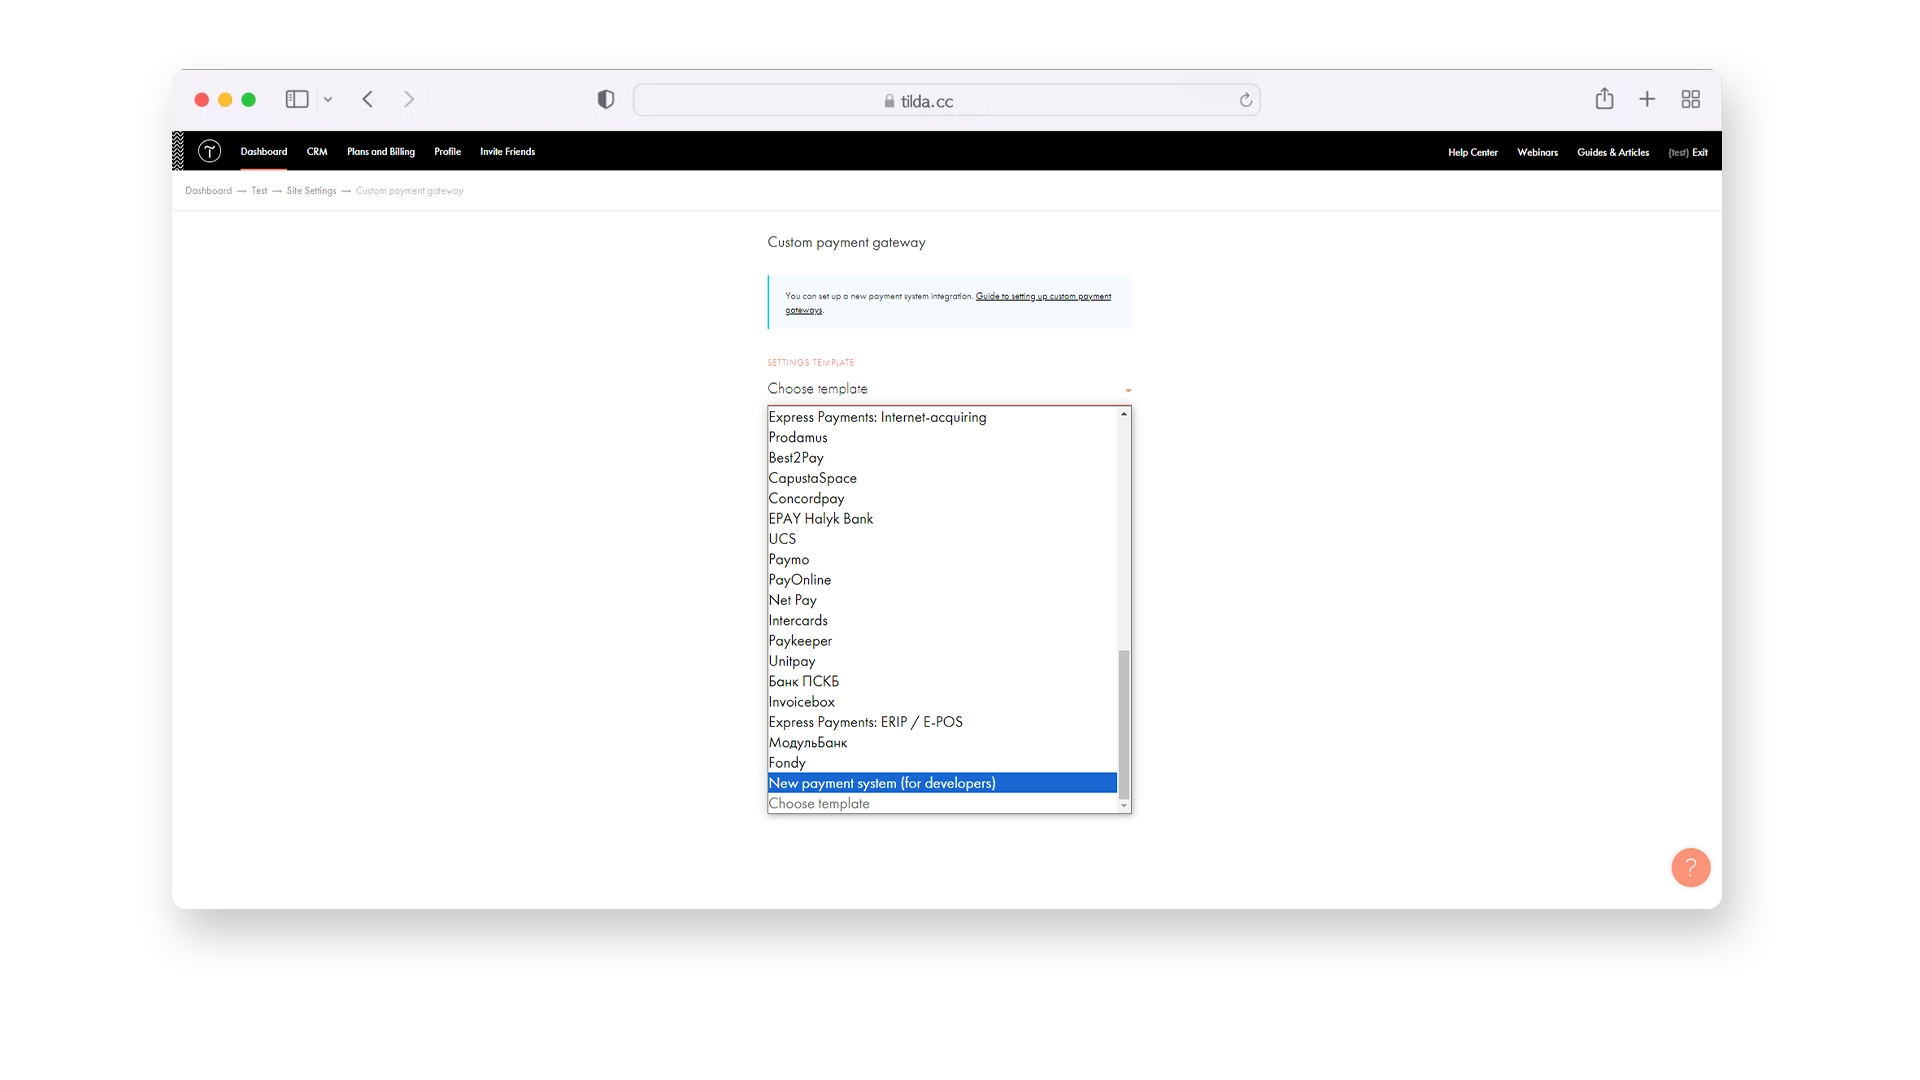
Step 4: Fill in the Basic Settings
- Fill in the following data: “LOGIN” and ”SECRET FOR ORDER SIGN”.
1.Field name: LOGIN; data: Merchant Uuid.
2.Field name: SECRET FOR ORDER SIGN; data: Payment key.
- Then add the API URL.
Field name: API URL; data: https://tilda.cryptomus.com/api/v1/create.

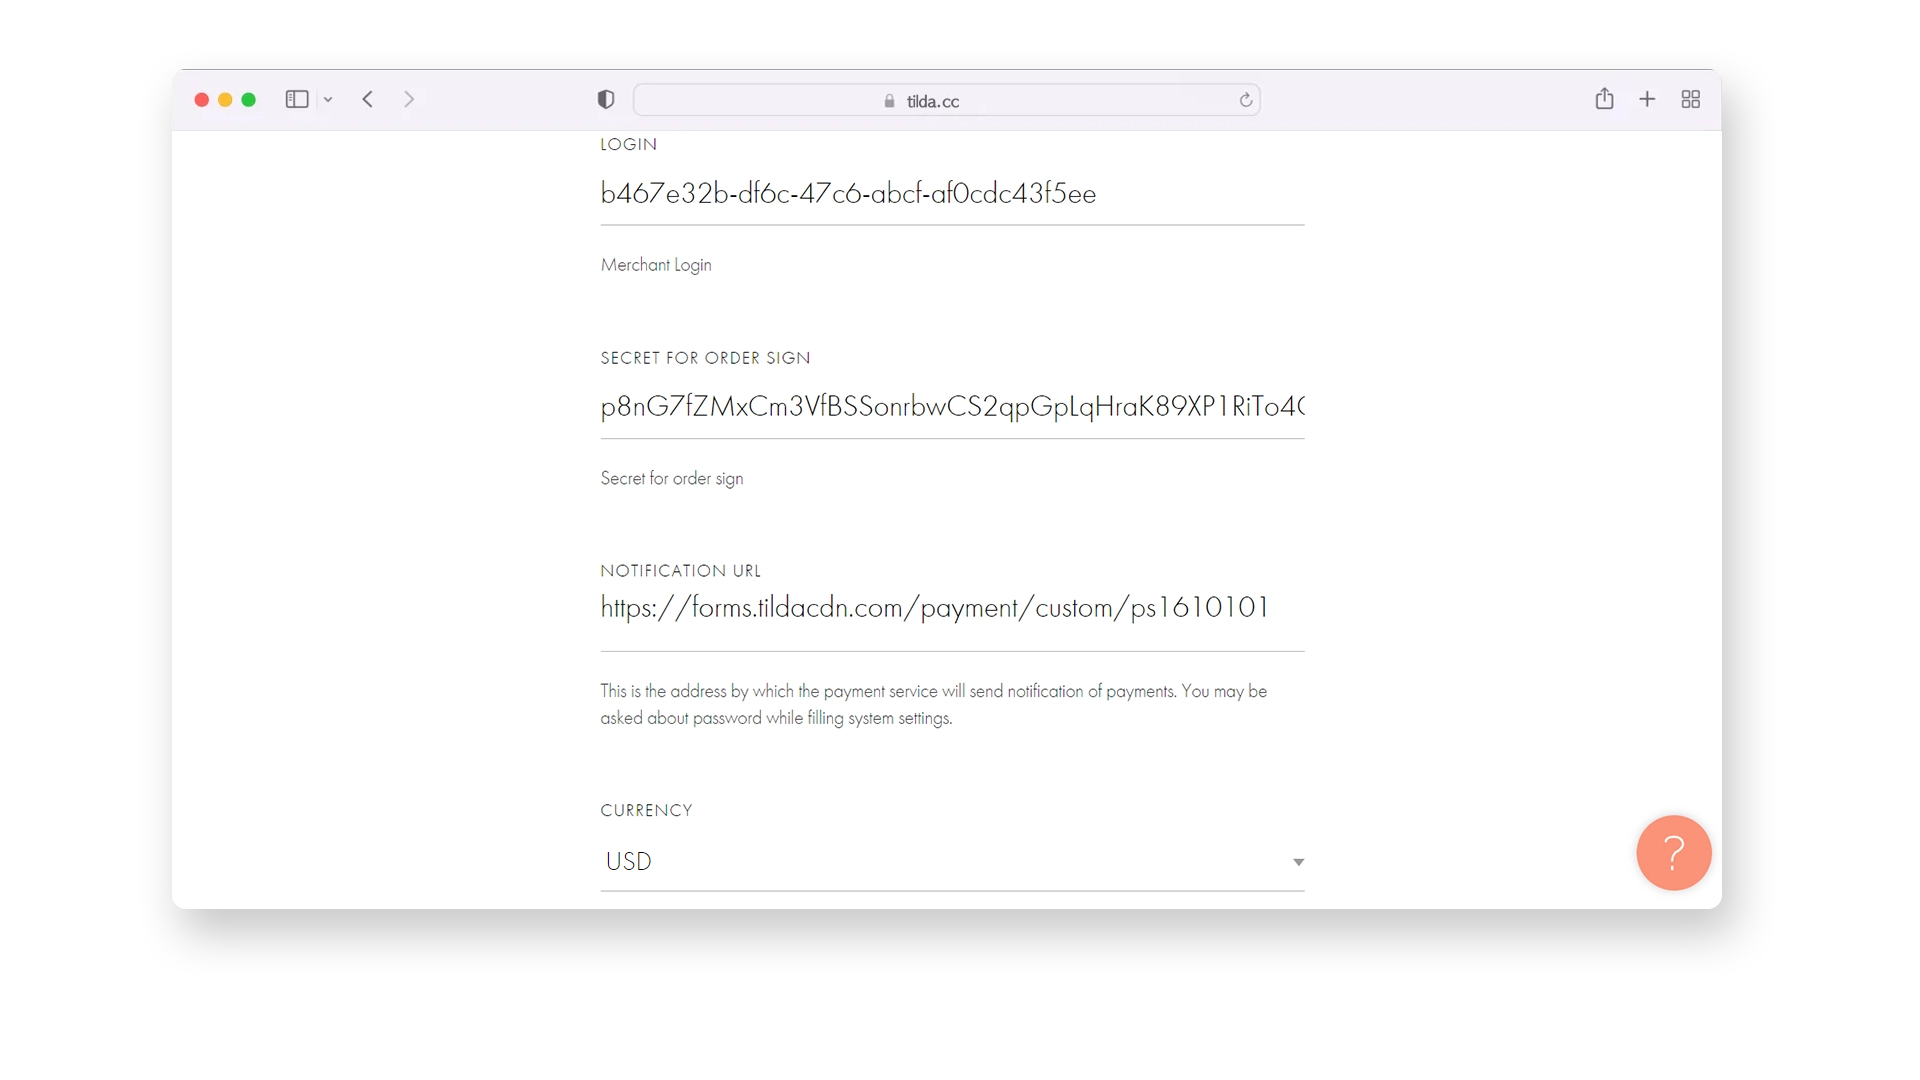
- Click on ADVANCED SETTINGS and fill in the following fields in the MAPPING FIELD LIST:
- Field name: Login; data: merchant.
- Field name: Currency; data: currency; additionally: EUR/USD.
- Field name: Language; data: lang; additionally: Uppercase.
- Field name: Country; data: country; additionally: Uppercase.
- Field name: Notification URL; data: url_callback.
- Field name: Order number; data: order_id; additionally: <project_id> _ <order_id>.
- Field name: Order description; data: description.
- Field name: Amount; data: amount; additionally: in USD/EUR.
- Field name: Customer email; data: email.
- Field name: Customer phone; data: phone.
- Field name: Customer name; data: name.
- Field name: Signature; data: sign.
- Field name: Products; data: items.
- Field name: Success URL; data: url_return.


Be sure to pay attention to the Additionally column.
Step 5: Configure ORDER SIGNATURE
The next step is to configure the ORDER SIGNATURE.
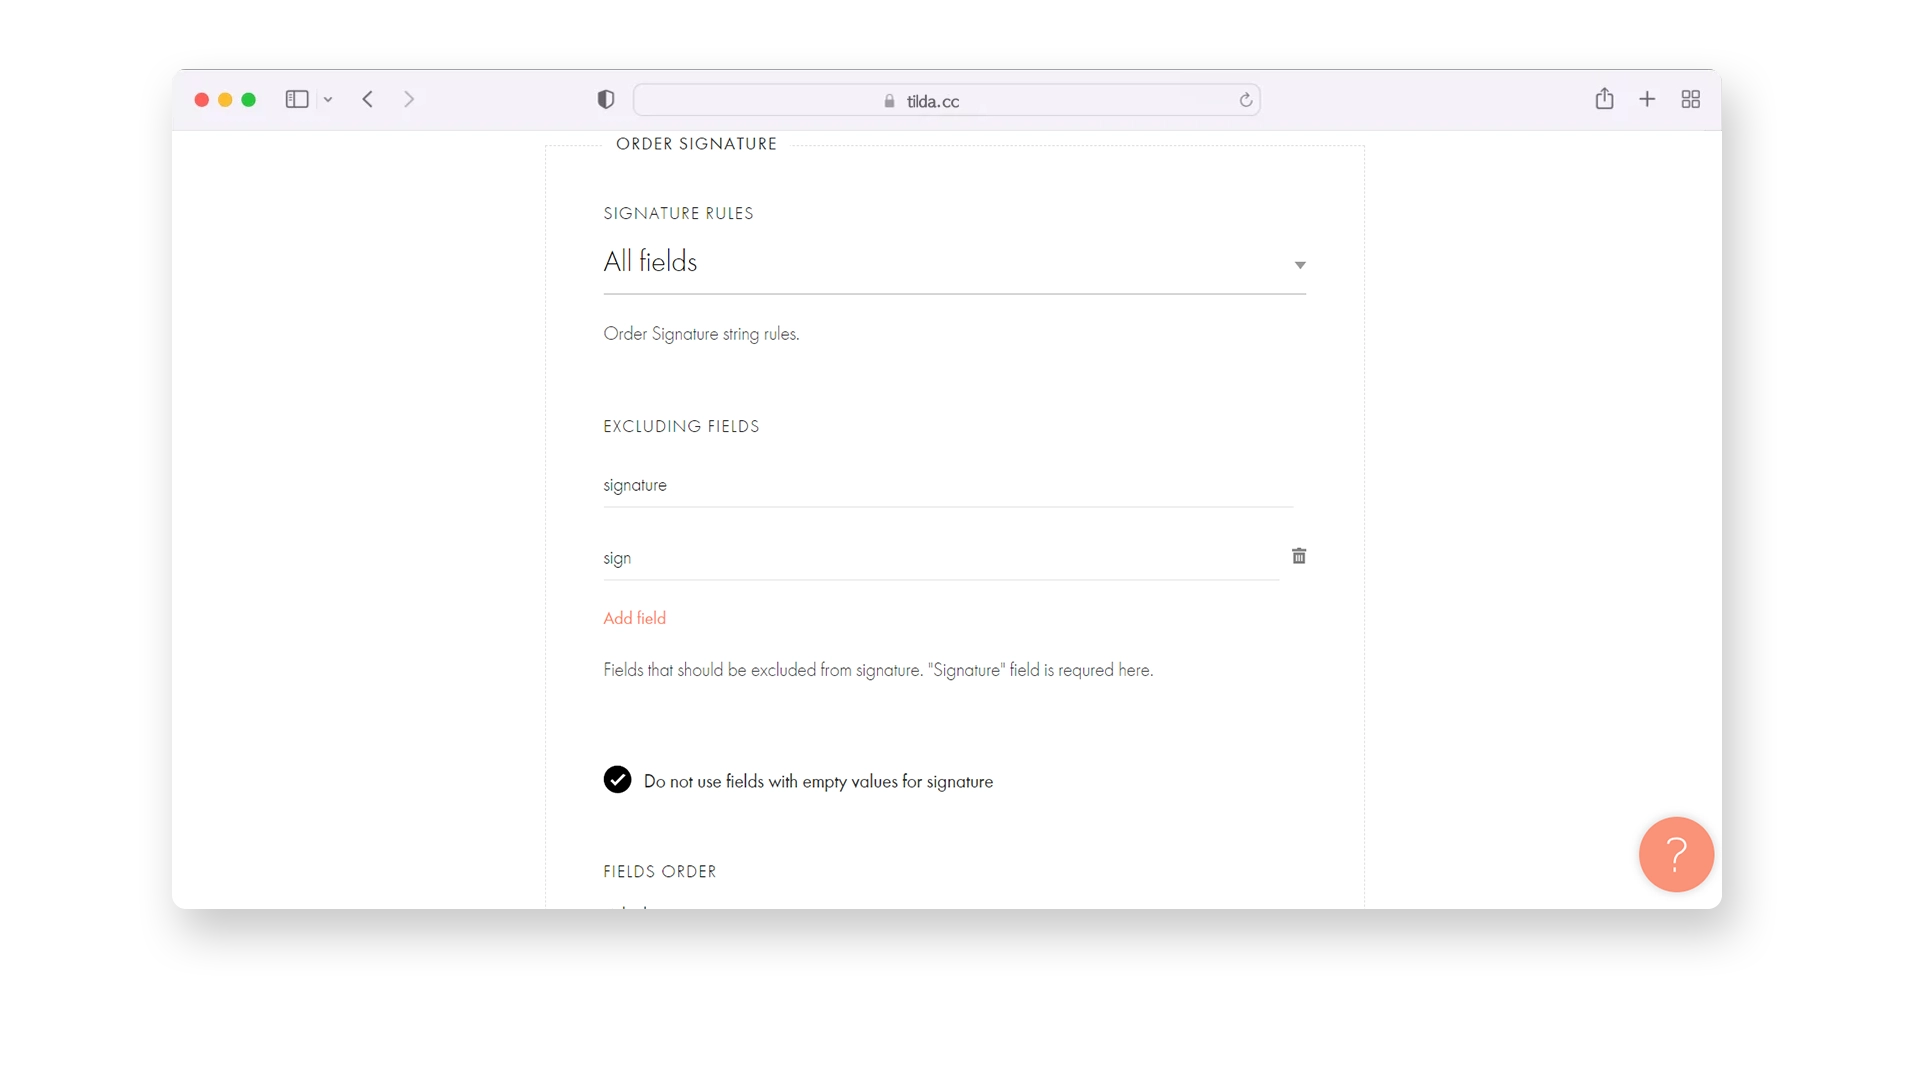
- Select All fields in the SIGNATURE RULES section.
- Type signature, then add field and type sign in the EXCLUDING FIELDS section.
- Activate the following option: Do not use fields with empty values for signature.
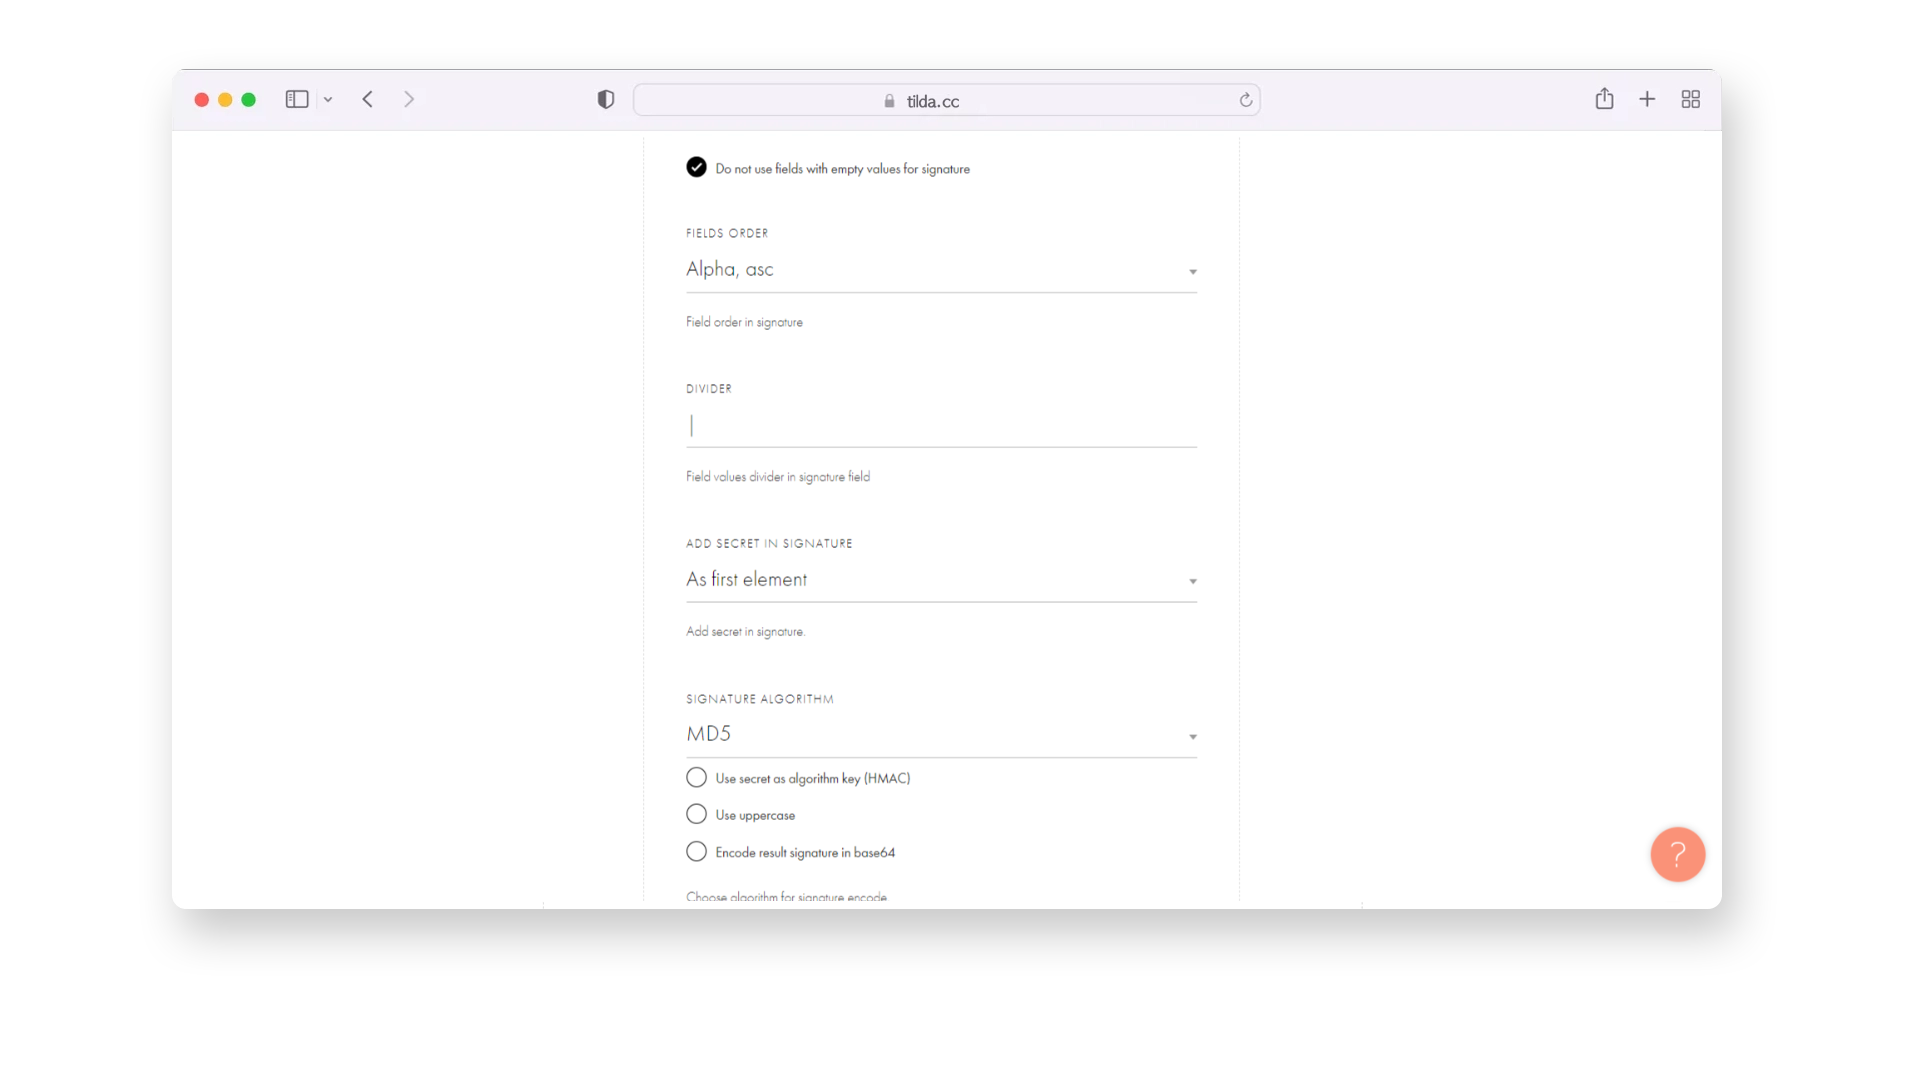
- Next, select Alpha, asc in the FIELDS ORDER section.
- Add the following DIVIDER: "|".
- In the ADD SECRET IN SIGNATURE field, select the As first element option.
- Then select SINATURE ALGORITHM "MD5".
Step 6: Set Up NOTIFICATION
Set up NOTIFICATION to receive updates or notifications regarding payment statuses or any other relevant information. To do this:
- Enter status and paid,paid_over in the SUCCESSFUL PAYMENT INDICATOR field.
- Next, fill in uuid and UUID in the TRANSACTION ID section.

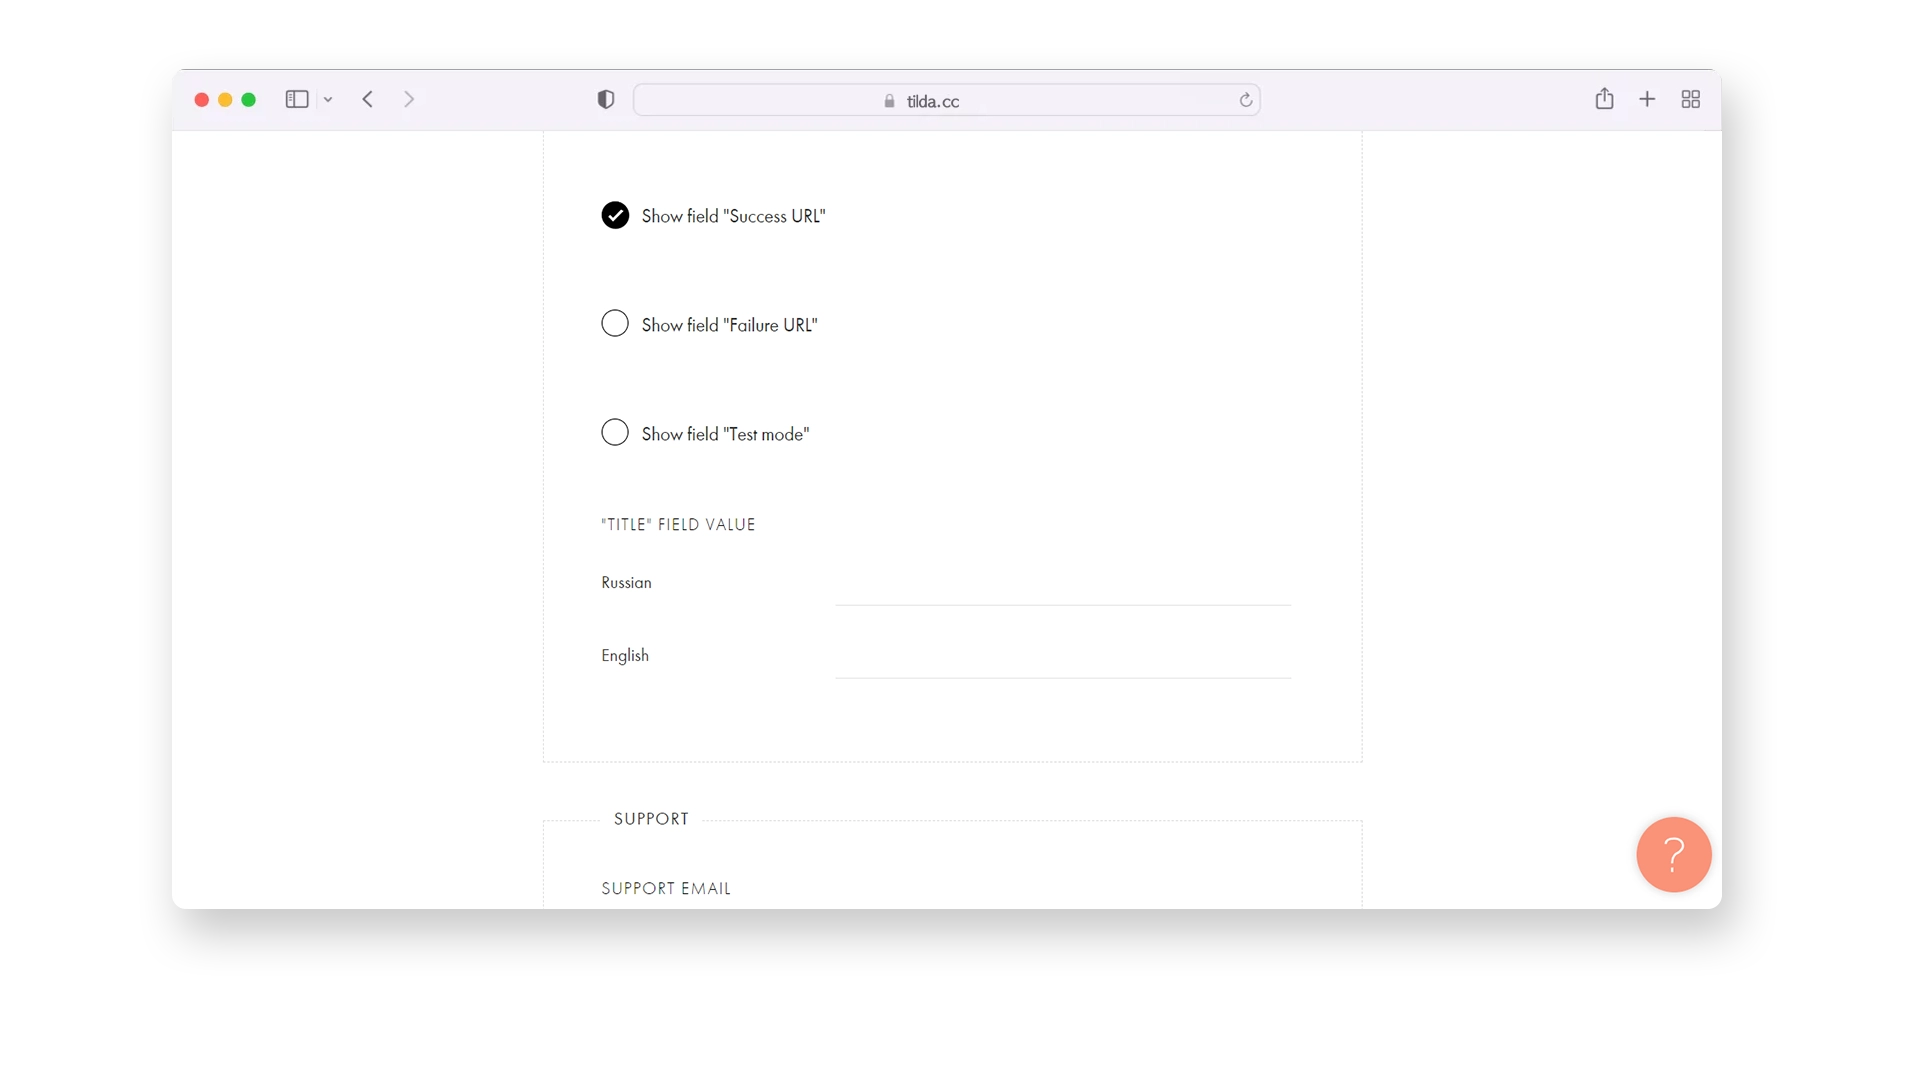
Step 7: Enable "Success URL"
Enable the option to show the "Success URL" field on the payment form. This step is essential for handling successful payment redirects.
Step 8: Save and Test
After completing all the steps and filling in the necessary information, save the settings. Test the custom payment gateway to ensure that it's functioning as expected.
Congratulations! You have officially activated the Tilda plugin, and you can now start receiving payments. Enjoy the convenience and benefits of processing transactions through this integration.


Simplify Your Crypto Journey
Want to store, send, accept, stake, or trade cryptocurrencies? With Cryptomus it's all possible — sign up and manage your cryptocurrency funds with our handy tools.
Get Started